December 8, 2011

Peppermint Christmas Template

By using this template, you agree to the terms of use.
Read here for instructions on how to add a template.

Click Here for the HTML/CSS Code
*This template may not show the header when you insert the HTML/CSS code. If it does not appear, do the following:

1. Go to the Design page and make sure you are on the Page Elements section.
2. Click on the Edit button on the Header box.
3. In the pop-up window, click "Behind Title and Description and then insert the following address in the box that says, "From the Web"

http://templates.blogdesignsbydani.com/peppermintchristmas/header.png

4. Click Save and View Blog. Your header should appear!


 This template includes:
  a wide 2-column layout
  a background
  a matching header
  a post icon (picture next to the post title)
  a post divider (picture in between each post)

You can add/change:
  •   the Blog title and description shown on the header
  •   the font colors
  •   the font  Click here to learn how.  (This template allows you to alter the date, post title and sidebar titles with a different font for each one.)
   Don't forget to add my button to your sidebar. Here's the code:


<center><a href=http://www.blogdesignsbydani.com/><img src="http://bdbd.blogdesignsbydani.com/Dani Button.png"/></a></center>


Images copyright Katie Castillo

From her kit Peppermint Patty

November 28, 2011

Christmas Treats Header

Use with the background: Christmas Treats


http://headers.blogdesignsbydani.com/JustSoScrappy/Christmas Treats%20Header.jpg

Or if you would like the exact same header as the Christmas Treats Template, use this header:


http://headers.blogdesignsbydani.com/JustSoScrappy/Christmas Treats%20Header2.png

Images copyright Katie Castillo
(from her kit called Gingerrific)

November 26, 2011

Christmas Treats Background

For those of you interested in just the background from the Christmas Treats Template, here it is:

 2-Column (Standard Width)


<script>document.write(unescape("%3Cstyle%20type%3D%22text/css%22%3Ebody%7Bbackground-image%3Aurl%28%22http%3A//backgrounds.blogdesignsbydani.com/JustSoScrappy/Christmas Treats.jpg%20%22%29%3Bbackground-position%3Acenter%3B%20background-repeat%3A%20no-repeat%3B%20background-attachment%3A%20fixed%3B%7D%3C/style%3E%20%3Cdiv%20id%3D%22tag%22%20style%3D%22position%3Aabsolute%3B%20left%3A0px%3Btop%3A30px%3B%20width%3A150px%3B%20height%3A50px%3B%22%3E%3Ca%20target%3D%22_blank%22%20href%3D%22http%3A//www.blogdesignsbydani.com%22%20title%3D%22http%3A//www.blogdesignsbydani.com%22%3E%3Cimg%20border%3D%220%22%20src%3D%22http%3A//backgrounds.blogdesignsbydani.com/tags/DaniBrown.png%22/%3E%20%3C/a%3E%3C/div%3E"))</script>
 
  3-Column (Wide Width)
<script>document.write(unescape("%3Cstyle%20type%3D%22text/css%22%3Ebody%7Bbackground-image%3Aurl%28%22http%3A//backgrounds.blogdesignsbydani.com/JustSoScrappy/Christmas Treats_3Column.jpg%20%22%29%3Bbackground-position%3Acenter%3B%20background-repeat%3A%20no-repeat%3B%20background-attachment%3A%20fixed%3B%7D%3C/style%3E%20%3Cdiv%20id%3D%22tag%22%20style%3D%22position%3Aabsolute%3B%20left%3A0px%3Btop%3A30px%3B%20width%3A150px%3B%20height%3A50px%3B%22%3E%3Ca%20target%3D%22_blank%22%20href%3D%22http%3A//www.blogdesignsbydani.com%22%20title%3D%22http%3A//www.blogdesignsbydani.com%22%3E%3Cimg%20border%3D%220%22%20src%3D%22http%3A//backgrounds.blogdesignsbydani.com/tags/DaniBrown.png%22/%3E%20%3C/a%3E%3C/div%3E"))</script>

Images copyright Katie Castillo
(from her kit called Gingerrific)

Matching Header

November 17, 2011

Christmas Treats Template

By using this template, you agree to the terms of use.
*This template may not show the header when you insert the HTML/CSS code. If it does not appear, do the following:

1. Go to the Design page and make sure you are on the Page Elements section.
2. Click on the Edit button on the Header box.
3. In the pop-up window, click "Behind Title and Description and then insert the following address in the box that says, "From the Web"

http://templates.blogdesignsbydani.com/christmastreats/header.png

4. Click Save and View Blog. Your header should appear!


 This template includes:
  a wide 2-column layout
  a background
  a matching header
  a post icon (picture next to the post title)
  a post divider (picture in between each post)

You can add/change:
  •    the Blog title and description shown on the header
  •    the font colors 
  •     the font  Click here to learn how.  (This template allows you to alter the date, post title and sidebar titles with a different font for each one.)
   Don't forget to add my button to your sidebar. Here's the code:


<center><a href=http://www.blogdesignsbydani.com/><img src="http://bdbd.blogdesignsbydani.com/Dani Button.png"/></a></center>


Images copyright Katie Castillo

From her kit Gingerrific

November 7, 2011

How to Add a Post Divider

Do you notice the divider that I have separating my posts? If you are trying to make your blog stand out, a post divider can really do the trick. It doesn't have to be anything fancy. In fact, simple is best when it comes to making a post divider. Here's what mine looks like:

Want to learn how to make one yourself? Here's how:


November 2, 2011

Updated Button Code

Hi Everyone,

With all the updates to the codes, I forgot to update my own button. Be sure to grab a new code for my button here or on my sidebar:


<center><a href=http://www.blogdesignsbydani.com/><img src="http://bdbd.blogdesignsbydani.com/Dani Button.png"/></a></center>

October 31, 2011

How to Add Your Signature to Your Blog Posts

Have you been wondering how to create and add a signature to the end of your blog posts like this one:


Let me show you how:

October 25, 2011

All Old Codes Are Now Gone

I deleted the last of my designs from my Photobucket account, my free templates. I hope everyone was able to grab a new code and maybe a new design before it was deleted. If not, please search through my free designs and find a new one. Thanks everyone for continuing to support my blog through all of that. I will try to post a new tutorial soon!

~Dani

October 22, 2011

Simple Pink


2-Column (Standard Width)
<script>document.write(unescape("%3Cstyle%20type%3D%22text/css%22%3Ebody%7Bbackground-image%3Aurl%28%22http%3A//backgrounds.blogdesignsbydani.com/JustSoScrappy/Simple Pink.jpg%20%22%29%3Bbackground-position%3Acenter%3B%20background-repeat%3A%20no-repeat%3B%20background-attachment%3A%20fixed%3B%7D%3C/style%3E%20%3Cdiv%20id%3D%22tag%22%20style%3D%22position%3Aabsolute%3B%20left%3A0px%3Btop%3A30px%3B%20width%3A150px%3B%20height%3A50px%3B%22%3E%3Ca%20target%3D%22_blank%22%20href%3D%22http%3A//www.blogdesignsbydani.com%22%20title%3D%22http%3A//www.blogdesignsbydani.com%22%3E%3Cimg%20border%3D%220%22%20src%3D%22http%3A//backgrounds.blogdesignsbydani.com/tags/DaniBrown.png%22/%3E%20%3C/a%3E%3C/div%3E"))</script>
 
  3-Column (Wide Width)
<script>document.write(unescape("%3Cstyle%20type%3D%22text/css%22%3Ebody%7Bbackground-image%3Aurl%28%22http%3A//backgrounds.blogdesignsbydani.com/JustSoScrappy/Simple Pink_3Column.jpg%20%22%29%3Bbackground-position%3Acenter%3B%20background-repeat%3A%20no-repeat%3B%20background-attachment%3A%20fixed%3B%7D%3C/style%3E%20%3Cdiv%20id%3D%22tag%22%20style%3D%22position%3Aabsolute%3B%20left%3A0px%3Btop%3A30px%3B%20width%3A150px%3B%20height%3A50px%3B%22%3E%3Ca%20target%3D%22_blank%22%20href%3D%22http%3A//www.blogdesignsbydani.com%22%20title%3D%22http%3A//www.blogdesignsbydani.com%22%3E%3Cimg%20border%3D%220%22%20src%3D%22http%3A//backgrounds.blogdesignsbydani.com/tags/DaniBrown.png%22/%3E%20%3C/a%3E%3C/div%3E"))</script>

Design Elements by Just So Scrappy
(from her kit called Think Pink)

Update to Background Tutorial

Do you guys remember my tutorial about How to Make Your Own Blog Background? Well, I've had a couple readers have a problem with the background showing up really small on their blog. Did anyone else have the same problem? Luckily, it is an easy fix and I have updated my instructions to help you. Check it out: How to Make Your Own Blog Background!

October 21, 2011

Backgrounds with Old Codes are Deleted

I have deleted all of my backgrounds with the old codes now. If you did not update yet, please look through my free backgrounds to get a new one with an updated code. I will delete the templates this weekend (possibly Monday).

Sorry for the mess. Thanks for supporting my blog!

~Dani

October 20, 2011

Headers with Old Codes are Deleted

Hi Everyone,

I have started removing the designs from my Photobucket account. I have only deleted the headers today. Tomorrow, I will do as many of the backgrounds as I can. Then I will delete the templates, maybe Saturday, but probably on Monday.

If you haven't updated your code yet, please do so now! Remind your friends too!

Thanks!
Dani

October 18, 2011

Last Reminder!!

Hi everyone!

I'm so sorry that I haven't posted anything new all month. I wanted to leave the post at the top reminding everyone to change their codes and explaining how to do it. Also, I have just been so busy with custom designs and just life in general. To make things even harder, my little one has dropped down to just one short nap during the day, leaving me VERY little time to get anything done!

Anyway, here's your last reminder to change your codes. I said to do it by Thursday the 20th, but I may not get to deleting the old ones until this weekend...but do it soon before you forget!

I'll try to get some new stuff up in the next few weeks. Do you want backgrounds, templates, headers? What do you want the most?

Thanks!
Dani

September 30, 2011

Time to Renew Your Codes

Hello Everyone,

I have a VERY important update for everyone. Since my blog has been growing, I have decided that I can no longer store my images on Photobucket. I simply have too many images. Instead, I have setup my own hosting account where I can store all of my images. As a result, I have had to change all of the codes for the backgrounds, headers, and templates.

This means that everyone that uses any of my designs will need to come back to my blog to get a new updated code for their blog by October 20. After this date, I will be deleting all of my designs from my Photobucket account.

If you do not update your code by this time, your background will disappear. 

I will temporarily change my tag (the one you see in the top left corner of my free backgrounds) so that it contains a warning to update the code. However, if you have friends using my templates or headers or whatever, please tell them to update their code. I would hate for anyone to lose their designs unexpectedly.

I know this is such a pain for everyone...believe me, it took me forever to change all the codes. But it had to be done.

Thank you everyone for supporting my blog!

~Dani

p.s. If you have updated recently, just look through the code and make sure you don't see the word "Photobucket". If you do see "Photobucket", you need to update your code.

Update:
If you are confused about how or where to find the updated codes, let me explain. To replace your old code with a new one, simply search through my free backgrounds (or free headers or templates) and find either the background you are currently using or a new one. Then, copy the code just like you did before. Then, go to your blog and find the gadget that contains the html for your background. Delete the old html and replace it with the new html that you just copied. 

Any code currently on my blog is an updated code.

You must update BEFORE October 20 to avoid losing your background.

If you have used one of my free headers, you may or may not have to update your header code depending on how you put it on your blog:
  •  If you saved the header to your computer and edited it yourself, then you don't need to update the code.
  • If you simply copied the code below the header and pasted it into the Header gadget, then you DO need to get an updated code.   
If you have any other questions, feel free to email me or leave a comment. Thanks!

September 26, 2011

Easy Canvas Prints Review

I recently was given the opportunity to review a product for Easy Canvas Prints. At Easy Canvas Prints, they put your pictures on canvas. I was offered an 11x14 canvas print in exchange for the review and was very excited. I decided to upgrade to a 16x20 for a small fee and LOVE the picture that was printed. Now, let me tell about the process:

The ordering process was really quite simple. First, you choose your size and upload your image. This site is really great because it checks your image to determine if it is a good enough quality to be blown up to the size you chose. I was worried about this because I didn't know if the image I chose had a high enough resolution to be enlarged to a 16x20. I really hate having to wait until it's printed to see that the picture is too blurry.

Next, I chose my border style. You can either have a solid color around the sides, a mirror image or a continuation of the pattern (image wrap). I chose the image wrap. The last step is an option to have your image retouched. If you are willing to pay some extra money, they will do that for you. I, myself, wouldn't pay for that, but that's because I love Photoshop and like to do it myself.

That's it...it really was easy....unless you are indecisive like me...and you change your mind about the size after you submit your order. Yeah, I don't recommend this, but it did give me an opportunity to test out their customer service. Normally they don't allow you to change your order after it is submitted because they start your canvas print immediately. But I called within just a few minutes of my order and was able to make the change. I originally ordered the 11x14, the size they offered me, but then realized the bigger size, 16x20 would look much better on my wall. Their customer service proved to be fantastic. The woman that helped me even called me back so that I didn't have to wait on the phone while she figured out how to make the change.

The hardest part of the whole process was choosing the photo to use. I didn't want to use a family picture because, unless they are classic ones like a wedding picture or a really sweet photo of a child, it can become outdated really fast. In the end, I chose something that was meaningful and also timeless, the place where my husband and I were married:

This picture was taken by Brandon Burton.
Here's a side view. (This is the 3/4" thickness.)
This picture is an LDS (Mormon) temple. To learn more, go to http://mormon.org/.

Now, here's the great news for you....if you want to put your own picture on canvas, just click on the link provided. When you go, you'll notice that you will receive 25% off your order plus free shipping.  Want a better discount? If you "Like" them on Facebook, you can get 50% off your order plus free shipping! 

Overall, this was an amazing offer for me! I love my canvas print! The great thing about a canvas is that you don't have to frame it if you don't want to. It looks good alone but also looks great in a frame. (If you choose to buy a frame, buy one with an open back. I've found some at Michael's that work great. You will have to buy a little kit to fasten your canvas to the frame, but it's pretty simple. If you ask an employee, I'm sure they could help you.)

The opinions in this review are entirely my own. I was compensated with a discounted canvas print in return for the review.

September 22, 2011

My Blog is Back

I'm so sorry about my blog disappearing yesterday! I don't know what exactly went wrong. I have a web hosting service where I manage my domain name (my new web address that is ".com" instead of ".blogspot.com"). This hosting service and my blog were set up to redirect the ".com" address to my blogspot blog. Yesterday for some strange reason it decided to stop redirecting it. I reset everything last night, set it all up again and it is back now. Thank goodness!

September 19, 2011

How to Make Your Blog Private

For many blogs, the idea of making your blog private doesn't make any sense, esp. if you are a commercial site. However, many blogs are used like a journal to document life events. A friend of mine has such a blog and has recently decided to make her blog private. She said that one day she was looking under the Stats tab on her Blogger Dashboard and then clicked on Traffic Sources. (This shows the list of sites that refer back to your blog.) She saw a site that she didn't recognize and so she clicked on it. On this site, someone had taken a picture of her young daughter, from her blog posts, and posted it on a child pornography site. How horrifying!

I hate hearing stories like this and hope this does not happen to you. If you would like to know how to make your blog private, here you go....

1. From your Blogger Dashboard, click Settings.
2. Click Permission
3. Where it says, "Who can view this blog?", click "Only people I choose"
4. Now, enter the email addresses, with commas separating them, and click Invite.

Now your blog is private!

Your friends and family will receive an email where they will either use their current Google account to login or create a new account. Everyone that goes to your blog address will have to login before they can see it.

September 13, 2011

Autumn Falls


2-Column (Standard Width)
<script>document.write(unescape("%3Cstyle%20type%3D%22text/css%22%3Ebody%7Bbackground-image%3Aurl%28%22http%3A//backgrounds.blogdesignsbydani.com/JustSoScrappy/Autumn Falls.jpg%20%22%29%3Bbackground-position%3Acenter%3B%20background-repeat%3A%20no-repeat%3B%20background-attachment%3A%20fixed%3B%7D%3C/style%3E%20%3Cdiv%20id%3D%22tag%22%20style%3D%22position%3Aabsolute%3B%20left%3A0px%3Btop%3A30px%3B%20width%3A150px%3B%20height%3A50px%3B%22%3E%3Ca%20target%3D%22_blank%22%20href%3D%22http%3A//www.blogdesignsbydani.com%22%20title%3D%22http%3A//www.blogdesignsbydani.com%22%3E%3Cimg%20border%3D%220%22%20src%3D%22http%3A//backgrounds.blogdesignsbydani.com/tags/DaniBrown.png%22/%3E%20%3C/a%3E%3C/div%3E"))</script>
 
  3-Column (Wide Width)
<script>document.write(unescape("%3Cstyle%20type%3D%22text/css%22%3Ebody%7Bbackground-image%3Aurl%28%22http%3A//backgrounds.blogdesignsbydani.com/JustSoScrappy/Autumn Falls_3Column.jpg%20%22%29%3Bbackground-position%3Acenter%3B%20background-repeat%3A%20no-repeat%3B%20background-attachment%3A%20fixed%3B%7D%3C/style%3E%20%3Cdiv%20id%3D%22tag%22%20style%3D%22position%3Aabsolute%3B%20left%3A0px%3Btop%3A30px%3B%20width%3A150px%3B%20height%3A50px%3B%22%3E%3Ca%20target%3D%22_blank%22%20href%3D%22http%3A//www.blogdesignsbydani.com%22%20title%3D%22http%3A//www.blogdesignsbydani.com%22%3E%3Cimg%20border%3D%220%22%20src%3D%22http%3A//backgrounds.blogdesignsbydani.com/tags/DaniBrown.png%22/%3E%20%3C/a%3E%3C/div%3E"))</script>

Design Elements by Just So Scrappy
(from her kit called Autumn Splendor)

September 12, 2011

Custom Design Update

For those of you interested in my Custom Designs, please read my update here.

September 9, 2011

Green Notebook Header

Use with the background: Green Notebook


http://headers.blogdesignsbydani.com/Crazy4Monograms/Green%20Notebook%20Header.jpg

Design Elements by
Crazy-4-Monograms
(from her kit called Class Act)

September 5, 2011

Removing Border Lines

Does your blog have borders that you don't want? If you have the Minima template you will have 2 border lines around your header, a border around pictures and maybe a few other things. Want to know how to remove those border lines?

August 29, 2011

Chalkboard Fun Template

By using this template, you agree to the terms of use.

 This template includes:
  a wide 2-column layout
  a background
  a matching header
  a post icon (picture next to the post title)
  a post divider (picture in between each post)

You can add/change:
  •     the Blog title and description shown on the header
  •    the font colors 
  •     the font  Click here to learn how.  (This template allows you to alter the date, post title and sidebar titles with a different font for each one.)
   Don't forget to add my button to your sidebar. Here's the code:


<center><a href=http://www.blogdesignsbydani.com/><img src="http://bdbd.blogdesignsbydani.com/Dani Button.png"/></a></center>


Design Elements by Crazy-4-Monograms
From her kit Class Act

August 26, 2011

New and Unique Fonts

I recently found a website called Graphic Design Degree. The author, Grant Dobbins, offers lots of information on finding schools and getting started. I would love more than anything to get a degree in graphic design, but since I have neither the time or money for it, I found another part of his site that I found interesting as well. You may enjoy it too.

I know when I do a design I am always looking for new and unique fonts to use. Unfortunately, I don't always know the best places to look for fonts. I usually use dafont.com but it's nice to have more than one resource. On Grant's site he has a page called "20 Amazing Web Sites to Find New and Unique Fonts". Not all of them are free, but you really can find some amazing fonts. If any of you are interested in typography, you can learn more on some of the links. 


So what are you waiting for? Go check it out!

August 20, 2011

What's the Difference Between a Background and a Template?

On my blog I offer both backgrounds and templates. Are you wondering what the difference is? Some people on the web use these two words interchangeably, but they are two very different things! Please listen carefully so that you understand the difference!

A Background is simply a picture. When you put it on your blog it acts like wallpaper. It just sits there and looks pretty (hopefully). Nothing more. These are great for people that don't want to any other design features changed on their blog OR, for people who do want to add other design features but want to add the features themselves. (Here's a list of all my backgrounds.)

A Template is a picture....and much more. All templates are different, but if you add a template from my blog, you will have not only a background image (wallpaper) but also a header, sometimes a Post Divider (cute graphic below your posts), matching font and font colors, a wider post section, sometimes a Post Icon (a little icon next to each post title), and many other little decorations for your blog. And when you follow the instructions and copy the code to your blog, everything gets put on for you! You don't have to do anything else but keep posting to your blog! (Here's a list of all my templates.)

When you think of it that way, it makes you wonder why you would ever just want a background. For me, it takes me ten times longer to make a template than it does to make a background. So naturally, I make more backgrounds. But for you, it's like I said above. Backgrounds are good for simple bloggers that don't want all the extra stuff or for those that want to add the features themselves.

I actually enjoy making the templates more than the backgrounds. It is a lot of fun but it really is a time issue for me. However, it is easier for me if I use the backgrounds already made and incorporate them into a template. So, if you have a background that you just love but want a little more with it, leave me a comment on that post or on this post telling me you want that background turned into a template. I'd love to make templates that people already are interested in!

Hope to hear your feedback!!


August 17, 2011

How to Shorten Long Posts

Have you seen blogs that cut off their posts on their main page and then have a link that says, "Read More"? I have one on my post about How to Make Your Own Blog Button. (If you click on this link it will bring you to the entire post but if you look at this post from the main page it will be shortened. It has a paragraph and then says, "Tutorial Here".)

I know it is irritating when you are browsing through someone's blog (including mine) and it takes forever to get down the main page because their posts are so long. I finally figured out how to shorten mine and will be doing so for all my long tutorials from now on. Do you want to know how?

I would write out a whole tutorial for you but Blogger already did, so here is the link and then I'll give you a few tips:


A few things I found:
  • I tried to add 'Jump Breaks' in my old posts and it didn't work. 
  • I found that I have to stick the line break in before typing any other text after. For example, if I were to stick my cursor after my first paragraph (after everything was already typed) it wouldn't put the break in when I publish my post. I would have to delete everything that comes after the jump, enter the jump, and then type it all in again.
Have you guys tried this already? What tips or questions do you have?


August 13, 2011

Green Notebook


2-Column
<script>document.write(unescape("%3Cstyle%20type%3D%22text/css%22%3Ebody%7Bbackground-image%3Aurl%28%22http%3A//backgrounds.blogdesignsbydani.com/Crazy4Monograms/Green%20Notebook.jpg%20%22%29%3Bbackground-position%3Acenter%3B%20background-repeat%3A%20no-repeat%3B%20background-attachment%3A%20fixed%3B%7D%3C/style%3E%20%3Cdiv%20id%3D%22tag%22%20style%3D%22position%3Aabsolute%3B%20left%3A0px%3Btop%3A30px%3B%20width%3A150px%3B%20height%3A50px%3B%22%3E%3Ca%20target%3D%22_blank%22%20href%3D%22http%3A//www.blogdesignsbydani.com%22%20title%3D%22http%3A//www.blogdesignsbydani.com%22%3E%3Cimg%20border%3D%220%22%20src%3D%22http%3A//backgrounds.blogdesignsbydani.com/tags/DaniBlacknWhite.png%22/%3E%20%3C/a%3E%3C/div%3E"))</script>
 
  3-Column
<script>document.write(unescape("%3Cstyle%20type%3D%22text/css%22%3Ebody%7Bbackground-image%3Aurl%28%22http%3A//backgrounds.blogdesignsbydani.com/Crazy4Monograms/Green%20Notebook_3Column.jpg%20%22%29%3Bbackground-position%3Acenter%3B%20background-repeat%3A%20no-repeat%3B%20background-attachment%3A%20fixed%3B%7D%3C/style%3E%20%3Cdiv%20id%3D%22tag%22%20style%3D%22position%3Aabsolute%3B%20left%3A0px%3Btop%3A30px%3B%20width%3A150px%3B%20height%3A50px%3B%22%3E%3Ca%20target%3D%22_blank%22%20href%3D%22http%3A//www.blogdesignsbydani.com%22%20title%3D%22http%3A//www.blogdesignsbydani.com%22%3E%3Cimg%20border%3D%220%22%20src%3D%22http%3A//backgrounds.blogdesignsbydani/tags/DaniBlacknWhite.png%22/%3E%20%3C/a%3E%3C/div%3E"))</script>

Design Elements by Crazy-4-Monograms
(from her kit called Class Act)

Matching Header

August 10, 2011

Flip Flops Header

Use with the background: Flip Flops


http://headers.blogdesignsbydani.com/SummertimeDesigns/FlipFlop%20Header.jpg

Design Elements by
Summertime Designs
(from her kit FlipFlopsicles)


August 6, 2011

Chalkboard Fun Header

Use with the background: Chalkboard Fun


http://headers.blogdesignsbydani.com/Crazy4Monograms/Chalkboard%20Fun%20Header.jpg

Design Elements by
Crazy-4-Monograms
(from her kit called Class Act)
and

Just So Scrappy
(from various kits)


August 3, 2011

Flip Flops


2-Column
<script>document.write(unescape("%3Cstyle%20type%3D%22text/css%22%3Ebody%7Bbackground-image%3Aurl%28%22http%3A//backgrounds.blogdesignsbydani.com/SummertimeDesigns/FlipFlops.jpg%20%22%29%3Bbackground-position%3Acenter%3B%20background-repeat%3A%20no-repeat%3B%20background-attachment%3A%20fixed%3B%7D%3C/style%3E%20%3Cdiv%20id%3D%22tag%22%20style%3D%22position%3Aabsolute%3B%20left%3A0px%3Btop%3A30px%3B%20width%3A150px%3B%20height%3A50px%3B%22%3E%3Ca%20target%3D%22_blank%22%20href%3D%22http%3A//www.blogdesignsbydani.com%22%20title%3D%22http%3A//www.blogdesignsbydani.com%22%3E%3Cimg%20border%3D%220%22%20src%3D%22http%3A//backgrounds.blogdesignsbydani.com/tags/DaniBlacknWhite.png%22/%3E%20%3C/a%3E%3C/div%3E"))</script>
 
  3-Column
<script>document.write(unescape("%3Cstyle%20type%3D%22text/css%22%3Ebody%7Bbackground-image%3Aurl%28%22http%3A//backgrounds.blogdesignsbydani.com/SummertimeDesigns/FlipFlops_3Column.jpg%20%22%29%3Bbackground-position%3Acenter%3B%20background-repeat%3A%20no-repeat%3B%20background-attachment%3A%20fixed%3B%7D%3C/style%3E%20%3Cdiv%20id%3D%22tag%22%20style%3D%22position%3Aabsolute%3B%20left%3A0px%3Btop%3A30px%3B%20width%3A150px%3B%20height%3A50px%3B%22%3E%3Ca%20target%3D%22_blank%22%20href%3D%22http%3A//www.blogdesignsbydani.com%22%20title%3D%22http%3A//www.blogdesignsbydani.com%22%3E%3Cimg%20border%3D%220%22%20src%3D%22http%3A//backgrounds.blogdesignsbydani.com/tags/DaniBlacknWhite.png%22/%3E%20%3C/a%3E%3C/div%3E"))</script>

Design Elements by Summertime Designs
(from her kit called FlipFlopsicles)

Matching Header

July 29, 2011

Backgrounds to be Deleted

A month or two ago I said I needed to delete the backgrounds that no one was using so that I could free up more space for my images. I have gone through and made a list of the backgrounds that no one has left any comments on, indicating to me that they were using them or were interested in them. I am only considering the old ones from 2009. If you have one of my old backgrounds, please look through this list and leave a comment on this post if you would like one of these to be kept. Click on the title to go to the post with that background.

Fun with Circles
Bubble Madness
Green Foliage
Rows of Flowers
Pink Grungy Swirls
Black n White Design
Green Embellished Swirls
Red n Orange Squares
4th of July: USA Flag
Stripes n Bubbles
Blue n Brown Diagonal Stripes
Blue n Green Diagonal Stripes
Trees
Red, Blue n Green Circles
Purple Plaid n Flowers
Blue Plaid n Flowers
Lime Green n Flowers
Lime Green Flowers n Stripes

Yellow, Red and Green Plaid and Stars
Wide Woven Blue

Pink n Orange Button
Falling Flowers - Pink
Falling Flowers - Blue
Falling Flowers - Purple

Blue Beveled
Multi-Colored Diamonds and Stripes
Sepia Striped Grain
Pink Flowers
Blue Flowers
Blue Torn
Brown n White n Orange
Brown n White n Pink

Green Circles
Green Waves
Green Swirls
Purple Stripes
Stars n Squiggles
Orange Squiggles
Wide Woven Pink 2
Wide Woven
Woven Black n White
Tulips, Tulips
Tulips

July 27, 2011

How to Make Your Own Blog Button

One of the best ways to get your blog noticed is to make a blog button. A blog button is a small image that fits in your sidebar that gives the title of your blog and when clicked, links directly to your blog. It really isn't very helpful to put your button on your own blog since anyone that sees it is already at your blog. However, if you put the right HTML code below your button, your readers can copy the code, paste it onto the sidebar of their blog and have your button show up on their blog. It's basically free advertising. Here's an example of mine:


&lt;center&gt;&lt;a href=http://www.blogdesignsbydani.com/&gt;&lt;img src="http://bdbd.blogdesignsbydani.com/Dani%20Button.png"/&gt;&lt;/a&gt;&lt;/center&gt;


Want to learn how to make one yourself?

July 25, 2011

Chalkboard Fun


2-Column
<script>document.write(unescape("%3Cstyle%20type%3D%22text/css%22%3Ebody%7Bbackground-image%3Aurl%28%22http%3A//backgrounds.blogdesignsbydani.com/Crazy4Monograms/Chalkboard%20Fun.jpg%20%22%29%3Bbackground-position%3Acenter%3B%20background-repeat%3A%20no-repeat%3B%20background-attachment%3A%20fixed%3B%7D%3C/style%3E%20%3Cdiv%20id%3D%22tag%22%20style%3D%22position%3Aabsolute%3B%20left%3A0px%3Btop%3A30px%3B%20width%3A150px%3B%20height%3A50px%3B%22%3E%3Ca%20target%3D%22_blank%22%20href%3D%22http%3A//www.blogdesignsbydani.com%22%20title%3D%22http%3A//www.blogdesignsbydani.com%22%3E%3Cimg%20border%3D%220%22%20src%3D%22http%3A//backgrounds.blogdesignsbydani.com/tags/DaniBlacknWhite.png%22/%3E%20%3C/a%3E%3C/div%3E"))</script>
 
  3-Column
<script>document.write(unescape("%3Cstyle%20type%3D%22text/css%22%3Ebody%7Bbackground-image%3Aurl%28%22http%3A//backgrounds.blogdesignsbydani.com/Crazy4Monograms/Chalkboard%20Fun_3Column.jpg%20%22%29%3Bbackground-position%3Acenter%3B%20background-repeat%3A%20no-repeat%3B%20background-attachment%3A%20fixed%3B%7D%3C/style%3E%20%3Cdiv%20id%3D%22tag%22%20style%3D%22position%3Aabsolute%3B%20left%3A0px%3Btop%3A30px%3B%20width%3A150px%3B%20height%3A50px%3B%22%3E%3Ca%20target%3D%22_blank%22%20href%3D%22http%3A//www.blogdesignsbydani.com%22%20title%3D%22http%3A//www.blogdesignsbydani.com%22%3E%3Cimg%20border%3D%220%22%20src%3D%22http%3A//backgrounds.blogdesignsbydani/tags/DaniBlacknWhite.png%22/%3E%20%3C/a%3E%3C/div%3E"))</script>

Design Elements by Crazy-4-Monograms
(from her kit called Class Act)

Matching Header

July 20, 2011

Dotted Flowers Header

Use with the background: Dotted Flowers


http://headers.blogdesignsbydani.com/JustSoScrappy/Dotted Flowers Header.jpg

Design Elements by Just So Scrappy
(from her kit called Tweet Tweet)


July 18, 2011

Yellow Daisies Template

By using this template, you agree to the terms of use.

 This template includes:
  a wide 2-column layout
  a background
  a matching header


You can add/change:
  the font  (Click here to learn how.)
  the font colors
  the Blog title and description shown on the header

NEW: The fonts for the Post Title, Sidebar Titles and Date Header can all be changed individually. Change them the same way you change all the other fonts.

Don't forget to add my button to your sidebar. Here's the code:


<center><a href=http://www.blogdesignsbydani.com/><img src="http://bdbd.blogdesignsbydani.com/Dani Button.png"/></a></center>


Design Elements by Just So Scrappy
From her kit Denim and Daisies

July 12, 2011

Bold Stars


2-Column (Standard Width)
<script>document.write(unescape("%3Cstyle%20type%3D%22text/css%22%3Ebody%7Bbackground-image%3Aurl%28%22http%3A//backgrounds.blogdesignsbydani.com/JustSoScrappy/Bold Stars.jpg%20%22%29%3Bbackground-position%3Acenter%3B%20background-repeat%3A%20no-repeat%3B%20background-attachment%3A%20fixed%3B%7D%3C/style%3E%20%3Cdiv%20id%3D%22tag%22%20style%3D%22position%3Aabsolute%3B%20left%3A0px%3Btop%3A30px%3B%20width%3A150px%3B%20height%3A50px%3B%22%3E%3Ca%20target%3D%22_blank%22%20href%3D%22http%3A//www.blogdesignsbydani.blogspot.com%22%20title%3D%22http%3A//www.blogdesignsbydani.com%22%3E%3Cimg%20border%3D%220%22%20src%3D%22http%3A//backgrounds.blogdesignsbydani.com/tags/DaniBlacknWhite.png%22/%3E%20%3C/a%3E%3C/div%3E"))</script>
 
  3-Column (Wide Width)
<script>document.write(unescape("%3Cstyle%20type%3D%22text/css%22%3Ebody%7Bbackground-image%3Aurl%28%22http%3A//backgrounds.blogdesignsbydani.com/JustSoScrappy/Bold Stars_3Column.jpg%20%22%29%3Bbackground-position%3Acenter%3B%20background-repeat%3A%20no-repeat%3B%20background-attachment%3A%20fixed%3B%7D%3C/style%3E%20%3Cdiv%20id%3D%22tag%22%20style%3D%22position%3Aabsolute%3B%20left%3A0px%3Btop%3A30px%3B%20width%3A150px%3B%20height%3A50px%3B%22%3E%3Ca%20target%3D%22_blank%22%20href%3D%22http%3A//www.blogdesignsbydani.com%22%20title%3D%22http%3A//www.blogdesignsbydani.com%22%3E%3Cimg%20border%3D%220%22%20src%3D%22http%3A//backgrounds.blogdesignsbydani.com/tags/DaniBlacknWhite.png%22/%3E%20%3C/a%3E%3C/div%3E"))</script>

Design Elements by Just So Scrappy
(from her kit called Boys Will Be Boys)

July 8, 2011

How to Change the Size and Font of Your Post Titles

Many of you may have noticed that when you go into the Template Designer in Blogger (if you have the Minima Template) and try to change the size and font of your Post Title there isn't an option to do so. (Remember my Post on Cute Blogger Fonts?) You can change the color, but not the size and font. Every other type of heading has that option, but not the Post Title. I don't know why this is, but there are a few ways to get around it.

The First option is to follow these instructions: Cute Font Post Titles and Sidebar Titles . This tutorial looks great on your blog, but is fairly complicated. It does allow you to use any true-type font you want and lets you adjust the size of these titles yourself. But it requires you to download several files and open a webs.com account.

The Second option I came up with myself. (You will have to edit your HTML, so make sure you back-up your template!) One more thing...this tutorial is just for the Blogger Minima Template. (Here's how to get this template: Follow Steps 4-7 HERE.)

(Click on images to enlarge them.)


From the Design tab, click "Edit HTML".
Scroll down until you see "Variable Definitions". Now, let's take a minute to understand what you see here: (Don't change anything yet! Just look!)
Every portion of text in your blog is given a color and a font (except the Post Title font). In order for your blog to know which ones to use, each type of text is given a "variable name". The first line says the Page Background Color has a variable name of "bgcolor". So when your HTML/CSS says "bgcolor" it will change the Page Background Color. If you look through this all, you will notice that there is a variable name for "Post Title Color" (it is "titlecolor") but there is not a variable name for "Post Title Font".

I will show you how to create a variable name for the "Post Title Font". Scroll down to see the variable names for the fonts: (Remember, don't change anything yet. Just look!)
We are going to copy the variable information for the Blog Title and make a few changes so that it will work for the Post Titles.

Here's how to do it:
1. In the Variable Definitions, copy the Variable definition for the Blog Title Font. Make sure to get the entire thing. Here it is just in case:

<Variable name="pagetitlefont" description="Blog Title Font"
             type="font"
             default="normal normal 200% Georgia, Serif" value="normal normal 200% Georgia, Serif">

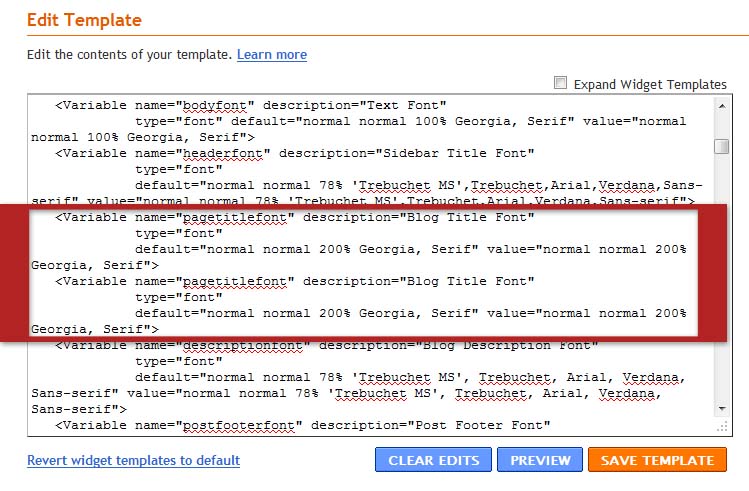
2. Now paste it right below the original so that you see the same thing twice. Your variable definitions should look like this:


3. In the Variable that you copied, you need to make the following changes:

Change "pagetitlefont" to "titlefont" and Change "Blog Title Font" to "Post Title Font"

Your new Variable should look like this: (I highlighted the changes for you in red.)

<Variable name="titlefont" description="Post Title Font"
             type="font"
             default="normal normal 200% Georgia, Serif" value="normal normal 200% Georgia, Serif">


4. Now scroll down until you see this:

/* Posts
-----------------------------------------------
 */

Scroll a little farther until you see:


Add the following line:
  font:$titlefont;

So that it reads:


(Make sure to copy it exactly. You must have the dollar sign and the semicolon or it won't work. Also, the bracket } must be where you see it above.)


3. Preview your changes and click "Save Template" if everything still looks ok. Your Post Title may not look much different, but as long as nothing drastically changed, you are fine.

4. Now time to change the font and size of your Post Title. From the Design tab, click "Template Designer". Then click "Advanced".

Scroll down until you see "Post Title Font"


Once the "Post Title Font" is highlighted, click the font you like best. (You can Preview it immediately when you click on each font.)


To make the Post Title bigger, change the percentage you see in the box to a bigger number. To make it smaller, change it to a smaller number. Just make sure you leave the % sign. To see the changes, just click in the blank gray area and the changes will be applied in the Preview box.

Once you are done, click "Apply to Blog" and then "View Blog"

There you go! Customized Post Title Font!

July 5, 2011

Crinkled Flowers Header 2

Use with the background: Crinkled Flowers


http://headers.blogdesignsbydani.com/JustSoScrappy/Crinkled Flowers Header2.jpg

Design Elements by Just So Scrappy
(from her kit called Memories)


July 1, 2011

Soft Dots and Plaid Header

Use with the background: Soft Dots and Plaid

Small
http://headers.blogdesignsbydani.com/JustSoScrappy/Soft Dots and Plaid Header_small.jpg


Large
http://headers.blogdesignsbydani.com/JustSoScrappy/Soft Dots and Plaid Header.jpg

Design Elements by Just So Scrappy
(from her kit called Baby Mine Boy)


June 30, 2011

Stars and Stripes


2-Column (Standard Width)
<script>document.write(unescape("%3Cstyle%20type%3D%22text/css%22%3Ebody%7Bbackground-image%3Aurl%28%22http%3A//backgrounds.blogdesignsbydani.com/JustSoScrappy/Stars and Stripes.jpg%20%22%29%3Bbackground-position%3Acenter%3B%20background-repeat%3A%20no-repeat%3B%20background-attachment%3A%20fixed%3B%7D%3C/style%3E%20%3Cdiv%20id%3D%22tag%22%20style%3D%22position%3Aabsolute%3B%20left%3A0px%3Btop%3A30px%3B%20width%3A150px%3B%20height%3A50px%3B%22%3E%3Ca%20target%3D%22_blank%22%20href%3D%22http%3A//www.blogdesignsbydani.com%22%20title%3D%22http%3A//blogdesignsbydani.com%22%3E%3Cimg%20border%3D%220%22%20src%3D%22http%3A//backgrounds.blogdesignsbydani.com/tags/DaniRedWhitenBlue.png%22/%3E%20%3C/a%3E%3C/div%3E"))</script>
 
  3-Column (Wide Width)
<script>document.write(unescape("%3Cstyle%20type%3D%22text/css%22%3Ebody%7Bbackground-image%3Aurl%28%22http%3A//backgrounds.blogdesignsbydani.com/JustSoScrappy/Stars and Stripes_3Column.jpg%20%22%29%3Bbackground-position%3Acenter%3B%20background-repeat%3A%20no-repeat%3B%20background-attachment%3A%20fixed%3B%7D%3C/style%3E%20%3Cdiv%20id%3D%22tag%22%20style%3D%22position%3Aabsolute%3B%20left%3A0px%3Btop%3A30px%3B%20width%3A150px%3B%20height%3A50px%3B%22%3E%3Ca%20target%3D%22_blank%22%20href%3D%22http%3A//www.blogdesignsbydani.com%22%20title%3D%22http%3A//www.blogdesignsbydani.com%22%3E%3Cimg%20border%3D%220%22%20src%3D%22http%3A//backgrounds.blogdesignsbydani.com/tags/DaniRedWhitenBlue.png%22/%3E%20%3C/a%3E%3C/div%3E"))</script>

Design Elements by Just So Scrappy
(from her kit called Liberty)

Free Design Program

Are you interested in making your own designs but don't have the software you need to get started? I recently found a design program that is very similar to Photoshop, is free and requires no download. You create your designs right on the website and you can still save them to your computer.

I have only played with this a little but I will try to use it in my design tutorials. In the meantime, check it out!

June 29, 2011

Puzzle Pieces Template

By using this template, you agree to the terms of use.

 This template includes:
  a wide 2-column layout
  a background
  a matching header
  a post icon (picture next to the post title)
  a post divider (picture in between each post)

You can add/change:
  the font  (Click here to learn how.)
  the font colors
  the Blog title and description shown on the header

Don't forget to add my button to your sidebar. Here's the code:


<center><a href=http://www.blogdesignsbydani.com/><img src="http://bdbd.blogdesignsbydani.com/Dani Button.png"/></a></center>


Design Elements by Just So Scrappy
From her kit Hope for Brady

June 28, 2011

Uncovering Fireworks

2-Column (Standard Width)
<script>document.write(unescape("%3Cstyle%20type%3D%22text/css%22%3Ebody%7Bbackground-image%3Aurl%28%22http%3A//backgrounds.blogdesignsbydani.com/JustSoScrappy/Uncovering Fireworks.jpg%20%22%29%3Bbackground-position%3Acenter%3B%20background-repeat%3A%20no-repeat%3B%20background-attachment%3A%20fixed%3B%7D%3C/style%3E%20%3Cdiv%20id%3D%22tag%22%20style%3D%22position%3Aabsolute%3B%20left%3A0px%3Btop%3A30px%3B%20width%3A150px%3B%20height%3A50px%3B%22%3E%3Ca%20target%3D%22_blank%22%20href%3D%22http%3A//blogdesignsbydani.com%22%20title%3D%22http%3A//www.blogdesignsbydani.com%22%3E%3Cimg%20border%3D%220%22%20src%3D%22http%3A//backgrounds.blogdesignsbydani.com/tags/DaniRedWhitenBlue.png%22/%3E%20%3C/a%3E%3C/div%3E"))</script>
 
  3-Column (Wide Width)
<script>document.write(unescape("%3Cstyle%20type%3D%22text/css%22%3Ebody%7Bbackground-image%3Aurl%28%22http%3A//backgrounds.blogdesignsbydani.com/JustSoScrappy/Uncovering Fireworks_3Column.jpg%20%22%29%3Bbackground-position%3Acenter%3B%20background-repeat%3A%20no-repeat%3B%20background-attachment%3A%20fixed%3B%7D%3C/style%3E%20%3Cdiv%20id%3D%22tag%22%20style%3D%22position%3Aabsolute%3B%20left%3A0px%3Btop%3A30px%3B%20width%3A150px%3B%20height%3A50px%3B%22%3E%3Ca%20target%3D%22_blank%22%20href%3D%22http%3A//www.blogdesignsbydani.com%22%20title%3D%22http%3A//www.blogdesignsbydani.com%22%3E%3Cimg%20border%3D%220%22%20src%3D%22http%3A//backgrounds.blogdesignsbydani.com/tags/DaniRedWhitenBlue.png%22/%3E%20%3C/a%3E%3C/div%3E"))</script>

Design Elements by Just So Scrappy
(from her kit called Liberty)

June 23, 2011

Scattered Stars Header

Use with the background: Scattered Stars


http://headers.blogdesignsbydani.com/JustSoScrappy/Scattered Stars Header.jpg

Design Elements by Just So Scrappy
(from her kit called Freedom)


June 17, 2011

Out of Town

Hi Everyone,

Just wanted to let you know that I am out of town (have been all week). I posted a tutorial and if I have time will do one more small one. But, I can't do any backgrounds or headers until I get back. I don't have my computer with me. I will make some more 4th of July backgrounds and headers as soon as I get back. If you have any tutorial requests, let me know!

~Dani

June 16, 2011

How to Add Your Own Sidebar Titles

Changing the fonts on your blog titles can really help your blog to stand out. (Read here to learn how to do it.) But if you want to do even more, you can add your own custom titles to your sidebar. Here is an example of custom sidebar titles:

Here's how to do it yourself: (Remember to click on an image to enlarge it.)

1. First, you will need any software that will allow you to create and edit graphics. I am using Photoshop Elements here, but you can apply these instructions to any graphics editing program.

To start, open a new file:

Start with a width of 200 pixels and a height of 100 pixels at a resolution of 72 pixels/inch. If you need to adjust it later, you can. Use RGB Color for web images. If your software allows you to have a transparent background, select Transparent. If it does not, you will have to make some adjustments that I will discuss later in these instructions.

2.  Type the text that you would like in your title. Add any effects or colors that you would like.


3. Add any embellishments or designs to your title.


You can create your own graphics or use clip art or digital scrapbook kits to add your embellishments. Just make sure that you check the terms of use of the creator/designer whose images you use. Some do not allow them to be used for websites/blogs or for commercial use (if your site is a business site).

4. Save your file. If you have a transparent background, save your file as a png. (What's a png? Read here.) If your graphics program does not allow you to save a file as a png, then you will have to do one of the following:

  a. Either alter your image so that it is a rectangle as you see below. Then save it as a jpg file.

OR
  b. Color the background so that it matches the background of your blog and save it as a jpg file.

5. Upload your image onto a site like Photobucket. You will need to create an account, if you haven't already. (It is free at Photobucket.)


6. Now you need the link code for your image. After you upload the image and before you go to the album, select the image and then choose "Generate link codes for selected".


A window will then pop-up:


If you click in the box for the Direct Link, the link will be copied to your computer's clipboard and you can then simply paste it where you need it.

(If you accidentally saved the image before getting the link code and you are now in your album, hover your mouse over your image until you see the option "Share". Click "Share" and then click "Get link code" from the pop-up window. Click the "Direct link" code until it is all highlighted and then copy it by choosing Edit, Copy or by pressing Ctrl-C on your keyboard.)

7. Time to add the code to your blog. Go to the Design tab from your Blogger Dashboard. Make sure you are on the Page Elements page and click "Add a Gadget" from the space that represents your blog sidebar. Choose "HTML/JavaScript". A window will pop-up. Do not type a title in this box. Type the following into the main box:

<center><img src="Direct Link"></center>

Replace the words Direct Link with the link you copied from Photobucket (or whatever site you used). 
Click Save.  

8. Now for a few adjustments. Move the new gadget so that it sits right above the gadget it is the title for. For example, if your title says, "About Me", place it right above the gadget containing your Profile. 

Also, you will need to remove the titles that are already in place. To do this, click on the gadget you have created a title for. In the box containing the title, delete the text you see there and click Save.

Do this for each title that you have created a title image for.

9. Once all images are created and on your blog, you may notice that your blog has dotted lines in between your image and the corresponding gadget. (This is the case with the Blogger Minima template. Other templates may have similar cases.)

If you have the Minima template, do the following to remove the dotted lines. Go to the Design tab and click "Edit HTML". Scroll down until you see the following. (If you can't find it, click Ctrl+F and type the following into the search box.):


    .sidebar .widget, .main .widget {
      border-bottom:1px dotted $bordercolor;
      margin:0 0 1.5em;
      padding:0 0 1.5em;
     }


Change the part in red from 1px to 0px. Click Preview and then Save if everything looks ok.

Click View Blog and you are done! You now have your own custom sidebar titles!