July 28, 2009

Pink Grungy Swirls


<script>document.write(unescape("%3Cstyle%20type%3D%22text/css%22%3Ebody%7Bbackground-image%3Aurl%28%22http%3A//backgrounds.blogdesignsbydani.com/Dani/Grungy Pink Swirls.jpg%20%22%29%3Bbackground-position%3Acenter%3B%20background-repeat%3A%20no-repeat%3B%20background-attachment%3A%20fixed%3B%7D%3C/style%3E%20%3Cdiv%20id%3D%22tag%22%20style%3D%22position%3Aabsolute%3B%20left%3A0px%3Btop%3A30px%3B%20width%3A150px%3B%20height%3A50px%3B%22%3E%3Ca%20target%3D%22_blank%22%20href%3D%22http%3A//www.blogdesignsbydani.blogspot.com%22%20title%3D%22http%3A//blogdesignsbydani.blogspot.com%22%3E%3Cimg%20border%3D%220%22%20src%3D%22http%3A//backgrounds.blogdesignsbydani.com/tags/DaniBlacknWhite.png%22/%3E%20%3C/a%3E%3C/div%3E"))</script>

July 27, 2009

Birds in a Tree


<script>document.write(unescape("%3Cstyle%20type%3D%22text/css%22%3Ebody%7Bbackground-image%3Aurl%28%22http%3A//backgrounds.blogdesignsbydani.com/Dani/Birds in a Tree.jpg%20%22%29%3Bbackground-position%3Acenter%3B%20background-repeat%3A%20no-repeat%3B%20background-attachment%3A%20fixed%3B%7D%3C/style%3E%20%3Cdiv%20id%3D%22tag%22%20style%3D%22position%3Aabsolute%3B%20left%3A0px%3Btop%3A30px%3B%20width%3A150px%3B%20height%3A50px%3B%22%3E%3Ca%20target%3D%22_blank%22%20href%3D%22http%3A//www.blogdesignsbydani.blogspot.com%22%20title%3D%22http%3A//blogdesignsbydani.blogspot.com%22%3E%3Cimg%20border%3D%220%22%20src%3D%22http%3A//backgrounds.blogdesignsbydani.com/tags/DaniBlacknWhite.png%22/%3E%20%3C/a%3E%3C/div%3E"))</script>

Grungy Rainbow Swirls


<script>document.write(unescape("%3Cstyle%20type%3D%22text/css%22%3Ebody%7Bbackground-image%3Aurl%28%22http%3A//backgrounds.blogdesignsbydani.com/Dani/Grungy Rainbow Swirls.jpg%20%22%29%3Bbackground-position%3Acenter%3B%20background-repeat%3A%20no-repeat%3B%20background-attachment%3A%20fixed%3B%7D%3C/style%3E%20%3Cdiv%20id%3D%22tag%22%20style%3D%22position%3Aabsolute%3B%20left%3A0px%3Btop%3A30px%3B%20width%3A150px%3B%20height%3A50px%3B%22%3E%3Ca%20target%3D%22_blank%22%20href%3D%22http%3A//www.blogdesignsbydani.blogspot.com%22%20title%3D%22http%3A//blogdesignsbydani.blogspot.com%22%3E%3Cimg%20border%3D%220%22%20src%3D%22http%3A//backgrounds.blogdesignsbydani.com/tags/DaniBlacknWhite.png%22/%3E%20%3C/a%3E%3C/div%3E"))</script>

How to Add a Template


By adding my designs to your blog, you agree to my terms of use.

UPDATE: Blogger has updated their interface and I have updated this tutorial to correspond to the new look. If you still have the old look, just look at the instructions that are in green. (I recently tried to add one of my templates and I was given an error message that I don't understand. I will update this more once I figure out the problem.)

What's the difference between a template and a background?
-A background is just the picture that shows up like wallpaper on the back of your blog.
-A template is a set of instructions that tells your blog what the layout should look like, i.e. how many columns, what font, etc.

Before you add a template:
1. Remove any free background you already have by clicking Layout from the drop down menu.
Then find the HTML/JavaScript gadget with your background in it and click Remove.

(Old interface instructions: Remove any free background you already have by clicking Design, then find the HTML/JavaScript gadget with your background in it and click Remove. )

2. Next, back-up your sidebar gadgets. You can do this however you choose. You can make a list of all the gadgets that you currently have, copy the html on those that use html, copy the info on any other gadgets and make sure that you can upload any sidebar pictures again. You shouldn't lose your gadgets by following my instructions, but you never know what might go wrong. It's best to be safe.

(Old interface instructions: same as above)


3. If you are changing from a 3-Column template to a 2-Column template, move all of your gadgets to your right sidebar. Do this by clicking Layout from the drop down menu or left sidebar (depending on what screen you are on) and then clicking and dragging each gadget into the sidebar on the right.

(Old interface instructions: You will click on Design instead of Layout.)

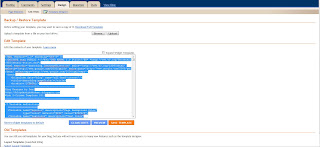
4. Now, backup your template by going to your Template page and clicking Backup/Restore on the right side of the screen. Click Download Full Template and Save. Find a folder on your computer to save it to.

After you have downloaded your template, click Edit HTML. It will give you a disclaimer about editing your HTML, warning you that only advanced users should edit the HTML and that you may not be able to use the Template Designer for all of its features if you do so. If you are ok with this, click "Proceed".

(Old interface instructions: Backup your template by going to your Layout page and clicking Edit HTML. At the top where it says "Backup/Restore Template", click Download Full Template and click Save. Find a folder on your computer to save it to.)


Now you are ready to add a Template.


To add a Template:
1. Click on the link given in the post of the template you like.
2. Select all of the text in the white section (Hold down "Ctrl" and then "A" or go to "Edit" and then "Select All")
Copy everything on the page. (To copy, make sure all of the text is selected and then hold down the "Ctrl" button and the "C" button or go to "Edit" at the top of your browser window and click "Copy".)

Here is what you should see. The code I selected is in blue. (Click to enlarge.):


3.  Go back to your Template page and click Edit HTML.

(Old interface instructions: Go back to your Design page and click Edit HTML.)

4. Erase everything in the box in the middle of the page as shown below, highlighted in blue.


(Old interface instructions: Erase everything in the box in the middle of the page as shown below, highlighted in blue.)

(Old Interface)

5. Paste the HTML that you copied into this box by holding down "Ctrl" and "V" or going to "Edit" at the top of the browser and clicking "Paste".
6. Click Save Template.
7. This last part is important!  Your blog may say, "Warning: Your new template does not include the following widgets:" and then it will list the extra widgets that you already have on your blog. It then asks if you want to keep them.  YES you do!  Click Keep Widgets.
8. Now, click View Blog.

You're done!!

If you have any problems, you can always go back to your old template by going back to the Template page ("Edit HTML" page on the old interface) and clicking "Backup/Restore" ("Upload" on the old interface). Find the copy of your original template that you saved to upload back onto your blog. Or simply choose any of Blogger's template from the Template Designer.

Or, if you have the old Blogger interface, you can go back to a "Minima" Template (the basic blogger template) by going to Design and clicking on Edit HTML and then clicking Select Layout Template (at the bottom) and then choosing "Minima". Click "Save Template". You will back to normal again.

Don't forget to add one my buttons when you are done!!

July 23, 2009

Black n White Design


<script>document.write(unescape("%3Cstyle%20type%3D%22text/css%22%3Ebody%7Bbackground-image%3Aurl%28%22http%3A//backgrounds.blogdesignsbydani.com/Dani/Black n White Ornamental.jpg%20%22%29%3Bbackground-position%3Acenter%3B%20background-repeat%3A%20no-repeat%3B%20background-attachment%3A%20fixed%3B%7D%3C/style%3E%20%3Cdiv%20id%3D%22tag%22%20style%3D%22position%3Aabsolute%3B%20left%3A0px%3Btop%3A30px%3B%20width%3A150px%3B%20height%3A50px%3B%22%3E%3Ca%20target%3D%22_blank%22%20href%3D%22http%3A//www.blogdesignsbydani.blogspot.com%22%20title%3D%22http%3A//blogdesignsbydani.blogspot.com%22%3E%3Cimg%20border%3D%220%22%20src%3D%22http%3A//backgrounds.blogdesignsbydani.com/tags/DaniBlacknWhite.png%22/%3E%20%3C/a%3E%3C/div%3E"))</script>

July 21, 2009

Green Embellished Swirls


<script>document.write(unescape("%3Cstyle%20type%3D%22text/css%22%3Ebody%7Bbackground-image%3Aurl%28%22http%3A//backgrounds.blogdesignsbydani.com/Dani/Green Embellish Swirls.jpg%20%22%29%3Bbackground-position%3Acenter%3B%20background-repeat%3A%20no-repeat%3B%20background-attachment%3A%20fixed%3B%7D%3C/style%3E%20%3Cdiv%20id%3D%22tag%22%20style%3D%22position%3Aabsolute%3B%20left%3A0px%3Btop%3A30px%3B%20width%3A150px%3B%20height%3A50px%3B%22%3E%3Ca%20target%3D%22_blank%22%20href%3D%22http%3A//www.blogdesignsbydani.blogspot.com%22%20title%3D%22http%3A//blogdesignsbydani.blogspot.com%22%3E%3Cimg%20border%3D%220%22%20src%3D%22http%3A//backgrounds.blogdesignsbydani.com/tags/Dani4.png%22/%3E%20%3C/a%3E%3C/div%3E"))</script>

July 20, 2009

How to Center your Header inside the Border Lines

Have you noticed that when you add a header it isn't centered inside the header border lines? If you want to fix that, you can either remove the lines, as explained in the previous post or follow these instructions:

1. Add your header as usual by logging in and clicking on Layout.
2. On the "Add and Arrange Page Elements" page, click Edit in the box where your header is located.
3. A window will pop-up. Click on the settings Behind Title and Description and Shrink to Fit.

4. Locate your header from your computer or the web and click Save.


Now for the harder part:

5. Go back to your Layout page and click Edit HTML.
6. Scroll down until you find the part of the code that looks like this:

(If you can't find it, hold down Ctrl and the letter F and type "Header" into the search box.)

7. Below that code, find the code that looks like this:

8. Add the code that you see below in red so that it matches the code below:

9. Click Save Template and View Blog.
You're done!

Removing the Border around your Header

To remove the border lines around your header:

1. Login to your blog and click on Layout.
2. Click on Edit HTML.
3. In the middle box, scroll down until you see the code that looks like this:
(If you can't find it, hold down the Ctrl button and the letter F and type "Header" into the search box.)

4. Now, change the part in red to look like the code below:

5. Click Save Template and View Blog.
You're done!

July 15, 2009

Black n White Squares


<script>document.write(unescape("%3Cstyle%20type%3D%22text/css%22%3Ebody%7Bbackground-image%3Aurl%28%22http%3A//backgrounds.blogdesignsbydani.com/Dani/Black n White Squares.jpg%20%22%29%3Bbackground-position%3Acenter%3B%20background-repeat%3A%20no-repeat%3B%20background-attachment%3A%20fixed%3B%7D%3C/style%3E%20%3Cdiv%20id%3D%22tag%22%20style%3D%22position%3Aabsolute%3B%20left%3A0px%3Btop%3A30px%3B%20width%3A150px%3B%20height%3A50px%3B%22%3E%3Ca%20target%3D%22_blank%22%20href%3D%22http%3A//www.blogdesignsbydani.blogspot.com%22%20title%3D%22http%3A//blogdesignsbydani.blogspot.com%22%3E%3Cimg%20border%3D%220%22%20src%3D%22http%3A//backgrounds.blogdesignsbydani.com/tags/DaniBlacknWhite.png%22/%3E%20%3C/a%3E%3C/div%3E"))</script>