June 11, 2009

Blue n White Ribbon


<script>document.write(unescape("%3Cstyle%20type%3D%22text/css%22%3Ebody%7Bbackground-image%3Aurl%28%22http%3A//backgrounds.blogdesignsbydani.com/Dani/Blue n White Ribbon.jpg%20%22%29%3Bbackground-position%3Acenter%3B%20background-repeat%3A%20no-repeat%3B%20background-attachment%3A%20fixed%3B%7D%3C/style%3E%20%3Cdiv%20id%3D%22tag%22%20style%3D%22position%3Aabsolute%3B%20left%3A0px%3Btop%3A30px%3B%20width%3A150px%3B%20height%3A50px%3B%22%3E%3Ca%20target%3D%22_blank%22%20href%3D%22http%3A//www.blogdesignsbydani.blogspot.com%22%20title%3D%22http%3A//blogdesignsbydani.blogspot.com%22%3E%3Cimg%20border%3D%220%22%20src%3D%22http%3A//backgrounds.blogdesignsbydani.com/tags/Dani4.png%22/%3E%20%3C/a%3E%3C/div%3E"))</script>


Do you want a matching header?

If you would like a header for your Designs by Dani background, please leave a comment telling me which background you would like it to match. I want to make sure that the headers I make are ones that you will use. Thanks!

June 10, 2009

Pink Baby Quilt


<script>document.write(unescape("%3Cstyle%20type%3D%22text/css%22%3Ebody%7Bbackground-image%3Aurl%28%22http%3A//backgrounds.blogdesignsbydani.com/Dani/Pink Baby Quilt.jpg%20%22%29%3Bbackground-position%3Acenter%3B%20background-repeat%3A%20no-repeat%3B%20background-attachment%3A%20fixed%3B%7D%3C/style%3E%20%3Cdiv%20id%3D%22tag%22%20style%3D%22position%3Aabsolute%3B%20left%3A0px%3Btop%3A30px%3B%20width%3A150px%3B%20height%3A50px%3B%22%3E%3Ca%20target%3D%22_blank%22%20href%3D%22http%3A//www.blogdesignsbydani.blogspot.com%22%20title%3D%22http%3A//blogdesignsbydani.blogspot.com%22%3E%3Cimg%20border%3D%220%22%20src%3D%22http%3A//backgrounds.blogdesignsbydani.com/tags/DaniBrown.png%22/%3E%20%3C/a%3E%3C/div%3E"))</script>

June 4, 2009

4th of July: USA Quilt


<script>document.write(unescape("%3Cstyle%20type%3D%22text/css%22%3Ebody%7Bbackground-image%3Aurl%28%22http%3A//backgrounds.blogdesignsbydani.com/Dani/USA Quilt.jpg%20%22%29%3Bbackground-position%3Acenter%3B%20background-repeat%3A%20no-repeat%3B%20background-attachment%3A%20fixed%3B%7D%3C/style%3E%20%3Cdiv%20id%3D%22tag%22%20style%3D%22position%3Aabsolute%3B%20left%3A0px%3Btop%3A30px%3B%20width%3A150px%3B%20height%3A50px%3B%22%3E%3Ca%20target%3D%22_blank%22%20href%3D%22http%3A//www.blogdesignsbydani.blogspot.com%22%20title%3D%22http%3A//blogdesignsbydani.blogspot.com%22%3E%3Cimg%20border%3D%220%22%20src%3D%22http%3A//backgrounds.blogdesignsbydani.com/tags/DaniRedWhitenBlue.png%22/%3E%20%3C/a%3E%3C/div%3E"))</script>

Blue n Purple Plaid n Flowers Header

Use with the Purple Plaid n Flowers Backgrounds.

http://headers.blogdesignsbydani.com/Dani/Blue n Purple Plaid n Flowers Header.jpg


Use the link below to place your header in the header frame.

http://headers.blogdesignsbydani.com/Dani/Blue n Purple Plaid n Flowers Header.png

Purple Plaid n Flowers Header

Use with the Purple Plaid n Flowers Background.

http://headers.blogdesignsbydani.com/Dani/Light Purple Plaid n Flowers Header.jpg


Use the link below to place your picture in the header frame.
http://headers.blogdesignsbydani.com/Dani/Light Purple Plaid n Flowers Header.png

Blue n Green Plaid n Flowers Header


http://headers.blogdesignsbydani.com/Dani/Blue n Green Plaid n Flowers Header.jpg


Use the link below to place your picture in the header frame.


http://headers.blogdesignsbydani.com/Dani/Blue n Green Plaid n Flowers Header.png

Lime Green Plaid n Flowers Header


http://headers.blogdesignsbydani.com/Dani/Lime Green Plaid n Flowers Header.jpg


Use the link below to place your picture in the header frame.
 
http://headers.blogdesignsbydani.com/Dani/Lime Green Plaid n Flowers Header.png

June 3, 2009

Happy Father's Day!

<script>document.write(unescape("%3Cstyle%20type%3D%22text/css%22%3Ebody%7Bbackground-image%3Aurl%28%22http%3A//backgrounds.blogdesignsbydani.com/Dani/Father's Day.jpg%20%22%29%3Bbackground-position%3Acenter%3B%20background-repeat%3A%20no-repeat%3B%20background-attachment%3A%20fixed%3B%7D%3C/style%3E%20%3Cdiv%20id%3D%22tag%22%20style%3D%22position%3Aabsolute%3B%20left%3A0px%3Btop%3A30px%3B%20width%3A150px%3B%20height%3A50px%3B%22%3E%3Ca%20target%3D%22_blank%22%20href%3D%22http%3A//www.blogdesignsbydani.blogspot.com%22%20title%3D%22http%3A//blogdesignsbydani.blogspot.com%22%3E%3Cimg%20border%3D%220%22%20src%3D%22http%3A//backgrounds.blogdesignsbydani.com/tags/Dani4.png%22/%3E%20%3C/a%3E%3C/div%3E"))</script>

Faded Black n White Circles HEADER 1


http://headers.blogdesignsbydani.com/Dani/Black n White Circles Header1_pic.jpg


Use the link below to place your picture in the header frame.


http://headers.blogdesignsbydani.com/Dani/Black n White Circles Header1_pic.png

Faded Black n White Circles HEADER 2

Click here for instructions on How to Add a Header

http://headers.blogdesignsbydani.com/Dani/Black n White Circles Header1.jpg

Faded Black n White Circles HEADER 3


http://headers.blogdesignsbydani.com/Dani/Black n White Circles Header2_pic.jpg


Use the link below to place your picture in the header frame.

http://headers.blogdesignsbydani.com/Dani/Black n White Circles Header2_pic.png

Faded Black n White Circles HEADER 4

Click here for instructions on How to Add a Header

http://headers.blogdesignsbydani.com/Dani/Black n White Circles Header2.jpg

How to Add a Header

A. Choose a header from the Free Headers.
B. Decide whether you want to use the header As Is or whether you would like to Edit it yourself.


To use the header As Is:
1. Copy the link below the header.
2. Login to your blog and click on Design.
3. This will take you to the “Page Elements” page. Find the rectangle in the middle that says “Header” and click Edit.
4. A window will pop-up. Select From the Web and Shrink to Fit. It is up to you whether you would like the header to be placed behind your title or instead of your title.

5. In the box that says “From the web”, Paste the link.
6. Click Save. Then click View Blog. You’re done!

To Edit the header yourself:
1. Right Click on the picture of the header you would like to use and choose Save Picture As.
2. Choose a folder to save the picture to and click Save.
3. Now, open any editing software that you have. This could include Photoshop, digital scrapbooking software, Picasa, Paint.net or any other basic Paint program. If you know how to use these programs to edit, then you are free to edit the picture as you choose.
4. To add the header to your blog, Login to your blog and click Design.
5. On the “Page Elements” page click Edit from the rectangle labeled “Header”.
6. A window will pop-up. Select From Your Computer, Instead of Title and Description, and Shrink to Fit.
7. Click Browse and find the file where your header was saved.

4th of July: Stars, stars, stars... Header

I've made a custom header for the 4th of July background Stars, stars, stars...


If you would like this header customized with a picture of your family and names of your family, as shown, please email me at:
email
Be sure to send a picture, what you would like written for your family name, and the names of your family members (optional). I can add more stars if you have several names and I can take the words off of the stars if you don't want the names added.

How to Edit a Header

There are many programs that you can use to edit your headers and many ways to edit. I have chosen to give instructions for Picasa 3 because everyone can access it. Picasa is free software available from Google. Other software you could use is Paint (the basic program that comes with most computers), Photoshop (there are two versions, the really expensive professional version and the cheaper one called Photoshop Elements), or any Digital Scrapbooking Software.

To start, Go To http://picasa.google.com/ and click Download Picasa 3. Follow the instructions given to download it onto your computer. I will now explain how to Add Text and Pictures to your header.

(You should already have chosen a header and saved it to your computer by Right-Clicking on the image and choosing Save As.)

Adding Text to your header:
1. Open Picasa and Double-Click on your header. This will bring you to the editor.

2. Click Text from the icons on the left.
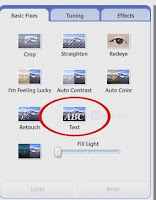

3. Click and Drag on your header to create a text box.

4. Type your text and Edit it as you choose using the buttons on the left. (After you type, you may have to highlight the text before pushing the buttons that change the size, color, etc.)

5. Click Apply and Back to Library when you are done.

6. If you do not have any pictures to add Skip to Step 19 to add the header to your blog.


Adding Pictures to your header:
7. Choose the picture(s) that you would like to add to your header. Move the header so that it is in the same folder as the picture(s) you will be using.

8. In Picasa, Select the header and the pictures by holding down “Ctrl” while clicking on each picture. Then click Collage.
Or
9. Choose the Settings as shown. (Picture Pile, Solid Color, Choose Any Size)

10. Click on the picture of the Header. Move your mouse over the picture until you see the glove. Then, Click the white dot and Drag out until the header mostly fills the page. (Keep the angle at 0.) You may need to let go and slide the picture over.

11. Now Adjust the size of your photo the same way, except rotate it at any angle you choose.

12. Click Create Collage when you are done.

13. Once the collage is done, you will see a box in the top left for further editing. Click Crop. (We will remove the extra black in the background.)

14. Choose Manual from the drop down menu.

15. Click and Drag your mouse so that a box appears. Adjust as necessary so that the box makes a border around your header.

16. Click Apply.

17. Find and click the Export button on the bottom of the screen.

18. Choose any folder to save it to, but click Use Original Size. (Make a note of the location that you saved it to so that you can find it later.) Click OK.

Putting the header on your blog:
19. Login to your blog and click Layout.

20. On the “Add and Arrange Page Elements” page click Edit from the rectangle labeled “Header”.

21. A window will pop-up. Select From Your Computer, Instead of Title and Description, and Shrink to Fit.
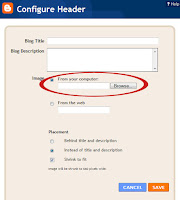
22. Click Browse and find the file where your header was saved.

23. Click Save and View Blog. Your done!!

4th of July: Stars, stars, stars...


<script>document.write(unescape("%3Cstyle%20type%3D%22text/css%22%3Ebody%7Bbackground-image%3Aurl%28%22http%3A//backgrounds.blogdesignsbydani.com/Dani/Happy 4th of July.jpg%20%22%29%3Bbackground-position%3Acenter%3B%20background-repeat%3A%20no-repeat%3B%20background-attachment%3A%20fixed%3B%7D%3C/style%3E%20%3Cdiv%20id%3D%22tag%22%20style%3D%22position%3Aabsolute%3B%20left%3A0px%3Btop%3A30px%3B%20width%3A150px%3B%20height%3A50px%3B%22%3E%3Ca%20target%3D%22_blank%22%20href%3D%22http%3A//www.blogdesignsbydani.blogspot.com%22%20title%3D%22http%3A//blogdesignsbydani.blogspot.com%22%3E%3Cimg%20border%3D%220%22%20src%3D%22http%3A//backgrounds.blogdesignsbydani.com/tags/DaniRedWhitenBlue.png%22/%3E%20%3C/a%3E%3C/div%3E"))</script>

4th of July: Red, White, n Blue Ribbon


<script>document.write(unescape("%3Cstyle%20type%3D%22text/css%22%3Ebody%7Bbackground-image%3Aurl%28%22http%3A//backgrounds.blogdesignsbydani.com/Dani/Red White n Blue Ribbon.jpg%20%22%29%3Bbackground-position%3Acenter%3B%20background-repeat%3A%20no-repeat%3B%20background-attachment%3A%20fixed%3B%7D%3C/style%3E%20%3Cdiv%20id%3D%22tag%22%20style%3D%22position%3Aabsolute%3B%20left%3A0px%3Btop%3A30px%3B%20width%3A150px%3B%20height%3A50px%3B%22%3E%3Ca%20target%3D%22_blank%22%20href%3D%22http%3A//www.blogdesignsbydani.blogspot.com%22%20title%3D%22http%3A//blogdesignsbydani.blogspot.com%22%3E%3Cimg%20border%3D%220%22%20src%3D%22http%3A//backgrounds.blogdesignsbydani.com/tags/DaniRedWhitenBlue.png%22/%3E%20%3C/a%3E%3C/div%3E"))</script>

4th of July: Star-Spangled Banner

<script>document.write(unescape("%3Cstyle%20type%3D%22text/css%22%3Ebody%7Bbackground-image%3Aurl%28%22http%3A//backgrounds.blogdesignsbydani.com/Dani/Star Spangled Banner.jpg%20%22%29%3Bbackground-position%3Acenter%3B%20background-repeat%3A%20no-repeat%3B%20background-attachment%3A%20fixed%3B%7D%3C/style%3E%20%3Cdiv%20id%3D%22tag%22%20style%3D%22position%3Aabsolute%3B%20left%3A0px%3Btop%3A30px%3B%20width%3A150px%3B%20height%3A50px%3B%22%3E%3Ca%20target%3D%22_blank%22%20href%3D%22http%3A//www.blogdesignsbydani.blogspot.com%22%20title%3D%22http%3A//blogdesignsbydani.blogspot.com%22%3E%3Cimg%20border%3D%220%22%20src%3D%22http%3A//backgrounds.blogdesignsbydani.com/tags/DaniRedWhitenBlue.png%22/%3E%20%3C/a%3E%3C/div%3E"))</script>