March 26, 2013

Making a Drop-Down Navigation Bar

I have received several comments asking for a tutorial on how to make a drop-down navigation bar like you see on my blog. This will be my last tutorial on this blog!

Now, I have to be honest. I created this tutorial 2-3 years ago and I struggled with it for a long time, trying to get it right. As I went back, I spent a lot of time trying to figure out what I did in the first place and even ran into some of the same errors as I did the first time. For this navigation bar, I used HTML Dog for the main part of the tutorial and various other help forums to figure out some of the rest. While I can give good explanations for most of the tutorial, there are some parts that I don't completely understand. Also, I am not a professional web designer. Some of my modifications are probably not be the best practices for web design. But for a beginner, they get the job done.

If you don't know anything about HTML/CSS, this tutorial may be difficult for you. I have given some explanations and links that should get you through the tutorial, but if you need to make additional modifications, you may have trouble. Creative Bloq has a list of the Top 20 Online Training Resources for anyone interested in learning more about web design. I have used #1 and 10 from that list and recommend those for beginners.

For this tutorial, I created a new navigation bar, similar to the one on my blog. I am using the Blogger Simple template that was customized in my tutorial on How to Make Your Own Custom Blog Template. You can look at the actual navigation bar on my Practice Blog. Here is a preview:


Want the full tutorial? Keep reading!

February 12, 2013

How to Make Your Own Custom Blog Template


I have finally finished my tutorial on How to Create Your Own Custom Blog Template! (or at least customize the Simple Template with your own amazing design) This tutorial is based on the designs that I like to make where the header is placed above the body of the blog in such a way that it looks like it has been cut away from the background as shown below:


This tutorial is my most advanced tutorial in terms of both graphic design skills and HTML/CSS knowledge and is quite long. However, if you have had success with my previous tutorials, don't be afraid to give this one a try! 


November 1, 2012

Photoshop Basic for Bloggers

When I was in high school, I took my first Graphic Design class. It was there that I was introduced to Photoshop and I fell in LOVE with it! Since then I have tried a lot of other design software and though many of them are good, they just don't compare in my eyes.

As bloggers, it is important to have great designs for your blog layout as well as for the images you post on your blog. Thus having software that can give you those great designs is so important! I know that Photoshop can be pricey (there is a really expensive version and a cheaper version). So if you are just starting out, there are a lot of decent options for graphic design software other than Photoshop and many of them free. But if you really want to move forward with your blog, I recommend starting with Photoshop Elements.

Now many of you may be intimidated by this program. If you have never used it before it really can be so confusing! But I have found a site that I wanted to share with everyone that offers Photoshop Basics for Bloggers. Suzie at The Accent Piece has put together 31 days days of Photoshop Basics for Bloggers. It is very basic, so if you are one of the many that are too scared to try it, check out her site!


How many of you use Photoshop?
What other software do you use?
What's your favorite?
What software do you prefer that I use in my tutorials?

September 18, 2012

Keep It Simple

I recently received an email from Longhornleads.com sharing with me a great article titled, 10 Reasons Your Site Needs to be Obvious for Users. I started this blog with the hopes of helping bloggers to create blogs that were more pleasing to the eye. Since then I have discovered many ways to make a blog really stand out and to make it easier for readers to find the information they are looking for. Read through Longhornleads' article to learn how to keep it simple and attract more readers to your blog. Then read through my Design Secrets to find the tutorials you need to help attract more readers.

August 14, 2012

Navigation Bar - Using Pages

A good blog needs to be easy to navigate. If your readers can't search through your posts quickly and easily to find what interests them, they probably won't be looking at your blog for long. There are so many different ways to make a navigation bar but I am going to explain very basic ones for now. Navigation bars can range from a very basic list of links to complicated drop-down menus. Some blogs even have their navigation bars creatively embedded in their header design.

I can definitely help you make a basic navigation bar, but I still don't know how to make the really creative types of navigation bars. I created my navigation bar a few years ago and I don't remember how I did it well enough to explain it. I do remember that it took me forever to figure out how to do the drop-down menus. I encountered a million glitches and eventually figured it out, even though the spacing in some browsers keeps it from lining up as well as I would like. However, if I have time after I finish this basic nav bar, I will look into my drop-down menu and try to figure out how I put it all together.

So let's get started on a basic navigation bar!

July 24, 2012

Blogs on Mobile Devices

Have you ever looked at your blog or other Blogger blogs from a mobile device like a phone or a tablet? You may be surprised to see that the background doesn't always look right. Let me first tell you what is wrong and then show you what you can do about it.

If you use any of my free backgrounds or other similar backgrounds from other sites you will notice a problem with the size and position of that background. Below is a rough sketch of what you might see when you view a blog on a phone:


On a mobile device, the background image is shrunk down to fit the size of the screen. But because a phone is much longer than it is wide, the image does not fill the screen. You could turn your phone on its side but it still does not fit the screen right. Also, the background image stays fixed at one position on the screen. It may be at the top or centered in the middle as you see above. Either way, this means that as you scroll, the background image will not move with your blog.

So how can you work around this problem and still have a great design on your blog? Let me tell you...


July 20, 2012

Update to Background Tutorial

I have noticed that a lot of the free backgrounds and more decorative backgrounds can take a long time for some computers to load. In fact, I have heard friends complain that the images on some blogs take so long to load that their slow computers just can't handle it. To help with this, I have updated my tutorial on How to Make Your Own Background using the Minima template. It is a simpler background that loads quickly on computers but still looks great. In some ways it even looks more professional than the more decorative designs.

Check it out here: 

April 20, 2012

How to Add a Post Icon (Simple Template)

Customizing the Simple Template - Part 4


Have you ever seen those cute little icons next to the title of each post? I have made several for my custom design customers and love them. They are just one more simple feature to draw attention to your blog without over doing it.

Making the actual post icon is very easy. And if you use the Blogger Simple template, adding the icon to your blog is even easier. You don't have to worry at all about editing the HTML and messing up your blog. You won't go anywhere near it in this tutorial.

Follow Part 1 of my Simple Template Tutorials to set your template to the Simple template.

Let's get started!


April 4, 2012

How to Make and Add a Post Divider (Simple Template)

Customizing the Simple Template - Part 3


Do you want a post divider for your blog but you are afraid to edit the HTML? If you answered yes, then this post is for you. In a previous post I showed you how to create a post divider like the one you see below:


My previous instructions showed you how to add the divider if your template is already set to the Minima template. This post will give you instructions on how to add the divider if your template is set to the Blogger Simple template. Follow Part 1 of my Simple Template Tutorials to set your template to the Simple template.

Let's get started!

March 14, 2012

How to Make Your Own Background (Simple Template)

Customizing the Simple Template - Part 2


In my last post, I showed you how to get your blog set up with the Blogger Simple template. Now it is time to start customizing it!

Let's get started with the background:


March 8, 2012

Customizing the Blogger Simple Template, Part 1

I have posted several tutorials on how to make your own blog background, post divider and such and I hope they have been useful to you. However, all of these tutorials have required that you use the Minima template. I like this template the most but this template does not allow you to take full advantage of the Template Designer. Also, many of you are terrified at the thought of editing the HTML on your own.

So, I would like to give you some instructions on how to add your own custom designs to the Blogger Simple template. If you use this template, you can adjust the widths of the columns, the arrangement of the columns and much more without having to edit the HTML at all! In fact, when you add all of your design elements, you won't ever have to click "Edit HTML"!

This first post will be all about getting your blog set-up with the Simple template of your choice. (There are several Simple templates. I'll help you choose!) My next post will show you how to add your own Custom Design Elements.

Ready to get started? Here we go!

November 7, 2011

How to Add a Post Divider

Do you notice the divider that I have separating my posts? If you are trying to make your blog stand out, a post divider can really do the trick. It doesn't have to be anything fancy. In fact, simple is best when it comes to making a post divider. Here's what mine looks like:

Want to learn how to make one yourself? Here's how:


October 31, 2011

How to Add Your Signature to Your Blog Posts

Have you been wondering how to create and add a signature to the end of your blog posts like this one:


Let me show you how:

October 22, 2011

Update to Background Tutorial

Do you guys remember my tutorial about How to Make Your Own Blog Background? Well, I've had a couple readers have a problem with the background showing up really small on their blog. Did anyone else have the same problem? Luckily, it is an easy fix and I have updated my instructions to help you. Check it out: How to Make Your Own Blog Background!

September 19, 2011

How to Make Your Blog Private

For many blogs, the idea of making your blog private doesn't make any sense, esp. if you are a commercial site. However, many blogs are used like a journal to document life events. A friend of mine has such a blog and has recently decided to make her blog private. She said that one day she was looking under the Stats tab on her Blogger Dashboard and then clicked on Traffic Sources. (This shows the list of sites that refer back to your blog.) She saw a site that she didn't recognize and so she clicked on it. On this site, someone had taken a picture of her young daughter, from her blog posts, and posted it on a child pornography site. How horrifying!

I hate hearing stories like this and hope this does not happen to you. If you would like to know how to make your blog private, here you go....

1. From your Blogger Dashboard, click Settings.
2. Click Permission
3. Where it says, "Who can view this blog?", click "Only people I choose"
4. Now, enter the email addresses, with commas separating them, and click Invite.

Now your blog is private!

Your friends and family will receive an email where they will either use their current Google account to login or create a new account. Everyone that goes to your blog address will have to login before they can see it.

September 5, 2011

Removing Border Lines

Does your blog have borders that you don't want? If you have the Minima template you will have 2 border lines around your header, a border around pictures and maybe a few other things. Want to know how to remove those border lines?

August 20, 2011

What's the Difference Between a Background and a Template?

On my blog I offer both backgrounds and templates. Are you wondering what the difference is? Some people on the web use these two words interchangeably, but they are two very different things! Please listen carefully so that you understand the difference!

A Background is simply a picture. When you put it on your blog it acts like wallpaper. It just sits there and looks pretty (hopefully). Nothing more. These are great for people that don't want to any other design features changed on their blog OR, for people who do want to add other design features but want to add the features themselves. (Here's a list of all my backgrounds.)

A Template is a picture....and much more. All templates are different, but if you add a template from my blog, you will have not only a background image (wallpaper) but also a header, sometimes a Post Divider (cute graphic below your posts), matching font and font colors, a wider post section, sometimes a Post Icon (a little icon next to each post title), and many other little decorations for your blog. And when you follow the instructions and copy the code to your blog, everything gets put on for you! You don't have to do anything else but keep posting to your blog! (Here's a list of all my templates.)

When you think of it that way, it makes you wonder why you would ever just want a background. For me, it takes me ten times longer to make a template than it does to make a background. So naturally, I make more backgrounds. But for you, it's like I said above. Backgrounds are good for simple bloggers that don't want all the extra stuff or for those that want to add the features themselves.

I actually enjoy making the templates more than the backgrounds. It is a lot of fun but it really is a time issue for me. However, it is easier for me if I use the backgrounds already made and incorporate them into a template. So, if you have a background that you just love but want a little more with it, leave me a comment on that post or on this post telling me you want that background turned into a template. I'd love to make templates that people already are interested in!

Hope to hear your feedback!!


August 17, 2011

How to Shorten Long Posts

Have you seen blogs that cut off their posts on their main page and then have a link that says, "Read More"? I have one on my post about How to Make Your Own Blog Button. (If you click on this link it will bring you to the entire post but if you look at this post from the main page it will be shortened. It has a paragraph and then says, "Tutorial Here".)

I know it is irritating when you are browsing through someone's blog (including mine) and it takes forever to get down the main page because their posts are so long. I finally figured out how to shorten mine and will be doing so for all my long tutorials from now on. Do you want to know how?

I would write out a whole tutorial for you but Blogger already did, so here is the link and then I'll give you a few tips:


A few things I found:
  • I tried to add 'Jump Breaks' in my old posts and it didn't work. 
  • I found that I have to stick the line break in before typing any other text after. For example, if I were to stick my cursor after my first paragraph (after everything was already typed) it wouldn't put the break in when I publish my post. I would have to delete everything that comes after the jump, enter the jump, and then type it all in again.
Have you guys tried this already? What tips or questions do you have?


July 27, 2011

How to Make Your Own Blog Button

One of the best ways to get your blog noticed is to make a blog button. A blog button is a small image that fits in your sidebar that gives the title of your blog and when clicked, links directly to your blog. It really isn't very helpful to put your button on your own blog since anyone that sees it is already at your blog. However, if you put the right HTML code below your button, your readers can copy the code, paste it onto the sidebar of their blog and have your button show up on their blog. It's basically free advertising. Here's an example of mine:


<center><a href=http://www.blogdesignsbydani.com/><img src="http://bdbd.blogdesignsbydani.com/Dani%20Button.png"/></a></center>


Want to learn how to make one yourself?

July 8, 2011

How to Change the Size and Font of Your Post Titles

Many of you may have noticed that when you go into the Template Designer in Blogger (if you have the Minima Template) and try to change the size and font of your Post Title there isn't an option to do so. (Remember my Post on Cute Blogger Fonts?) You can change the color, but not the size and font. Every other type of heading has that option, but not the Post Title. I don't know why this is, but there are a few ways to get around it.

The First option is to follow these instructions: Cute Font Post Titles and Sidebar Titles . This tutorial looks great on your blog, but is fairly complicated. It does allow you to use any true-type font you want and lets you adjust the size of these titles yourself. But it requires you to download several files and open a webs.com account.

The Second option I came up with myself. (You will have to edit your HTML, so make sure you back-up your template!) One more thing...this tutorial is just for the Blogger Minima Template. (Here's how to get this template: Follow Steps 4-7 HERE.)

(Click on images to enlarge them.)


From the Design tab, click "Edit HTML".
Scroll down until you see "Variable Definitions". Now, let's take a minute to understand what you see here: (Don't change anything yet! Just look!)
Every portion of text in your blog is given a color and a font (except the Post Title font). In order for your blog to know which ones to use, each type of text is given a "variable name". The first line says the Page Background Color has a variable name of "bgcolor". So when your HTML/CSS says "bgcolor" it will change the Page Background Color. If you look through this all, you will notice that there is a variable name for "Post Title Color" (it is "titlecolor") but there is not a variable name for "Post Title Font".

I will show you how to create a variable name for the "Post Title Font". Scroll down to see the variable names for the fonts: (Remember, don't change anything yet. Just look!)
We are going to copy the variable information for the Blog Title and make a few changes so that it will work for the Post Titles.

Here's how to do it:
1. In the Variable Definitions, copy the Variable definition for the Blog Title Font. Make sure to get the entire thing. Here it is just in case:

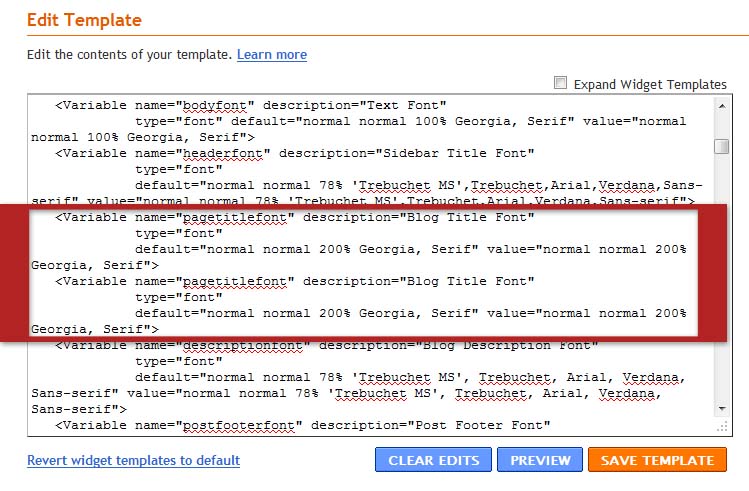
<Variable name="pagetitlefont" description="Blog Title Font"
             type="font"
             default="normal normal 200% Georgia, Serif" value="normal normal 200% Georgia, Serif">

2. Now paste it right below the original so that you see the same thing twice. Your variable definitions should look like this:


3. In the Variable that you copied, you need to make the following changes:

Change "pagetitlefont" to "titlefont" and Change "Blog Title Font" to "Post Title Font"

Your new Variable should look like this: (I highlighted the changes for you in red.)

<Variable name="titlefont" description="Post Title Font"
             type="font"
             default="normal normal 200% Georgia, Serif" value="normal normal 200% Georgia, Serif">


4. Now scroll down until you see this:

/* Posts
-----------------------------------------------
 */

Scroll a little farther until you see:


Add the following line:
  font:$titlefont;

So that it reads:


(Make sure to copy it exactly. You must have the dollar sign and the semicolon or it won't work. Also, the bracket } must be where you see it above.)


3. Preview your changes and click "Save Template" if everything still looks ok. Your Post Title may not look much different, but as long as nothing drastically changed, you are fine.

4. Now time to change the font and size of your Post Title. From the Design tab, click "Template Designer". Then click "Advanced".

Scroll down until you see "Post Title Font"


Once the "Post Title Font" is highlighted, click the font you like best. (You can Preview it immediately when you click on each font.)


To make the Post Title bigger, change the percentage you see in the box to a bigger number. To make it smaller, change it to a smaller number. Just make sure you leave the % sign. To see the changes, just click in the blank gray area and the changes will be applied in the Preview box.

Once you are done, click "Apply to Blog" and then "View Blog"

There you go! Customized Post Title Font!