December 6, 2012

Christmas Dream Template


 This template includes:
  a wide 2-column layout
  a background
  a matching header
  a post icon (picture next to the post title)
  a post divider (picture in between each post)

You can add/change:
  •   the Blog title and description shown on the header
  •   the font colors
  •   the font  Click here to learn how.  (This template allows you to alter the date, post title and sidebar titles with a different font for each one.)
   Don't forget to add my button to your sidebar. Here's the code:


<center><a href=http://www.blogdesignsbydani.com/><img src="http://bdbd.blogdesignsbydani.com/Dani Button.png"/></a></center>


Images copyright Katie Castillo
From her kit Heavenly Christmas

January 31, 2012

Blank 3-Column Template

This template is a blank template, meaning there is no background image, no header, no designs on the blog. The template, however, has been modified to allow for 3 columns. My free 3-column backgrounds can be used with this template.

By using this template, you agree to the terms of use.
Read here for instructions on how to add a template.

Click Here for HTML/CSS Code


You can add/change:
  •   the Blog title and description shown on the header
  •   the font colors
  •   the font  Click here to learn how.  (This template allows you to alter the date, post title and   sidebar titles with a different font for each one.) 
  •   the background
  •   the header
   Don't forget to add my button to your sidebar. Here's the code:


<center><a href=http://www.blogdesignsbydani.com/><img src="http://bdbd.blogdesignsbydani.com/Dani Button.png"/></a></center>


January 26, 2012

Cherished Love Template

By using this template, you agree to the terms of use.
Read here for instructions on how to add a template.

Click Here for HTML/CSS Code
*This template may not show the header when you insert the HTML/CSS code. If it does not appear, do the following:

1. Go to the Design page and make sure you are on the Page Elements section.
2. Click on the Edit button on the Header box.
3. In the pop-up window, click "Behind Title and Description and then insert the following address in the box that says, "From the Web"

http://templates.blogdesignsbydani.com/loveyou/header.png

4. Click Save and View Blog. Your header should appear!


 This template includes:
  a wide 2-column layout
  a background
  a matching header
  a post icon (picture next to the post title)
  a post divider (picture in between each post)

You can add/change:
  •   the Blog title and description shown on the header
  •   the font colors
  •   the font  Click here to learn how.  (This template allows you to alter the date, post title and sidebar titles with a different font for each one.)
   Don't forget to add my button to your sidebar. Here's the code:


<center><a href=http://www.blogdesignsbydani.com/><img src="http://bdbd.blogdesignsbydani.com/Dani Button.png"/></a></center>


Images copyright Katie Castillo
From her kit Cherish

December 8, 2011

Peppermint Christmas Template

By using this template, you agree to the terms of use.
Read here for instructions on how to add a template.

Click Here for the HTML/CSS Code
*This template may not show the header when you insert the HTML/CSS code. If it does not appear, do the following:

1. Go to the Design page and make sure you are on the Page Elements section.
2. Click on the Edit button on the Header box.
3. In the pop-up window, click "Behind Title and Description and then insert the following address in the box that says, "From the Web"

http://templates.blogdesignsbydani.com/peppermintchristmas/header.png

4. Click Save and View Blog. Your header should appear!


 This template includes:
  a wide 2-column layout
  a background
  a matching header
  a post icon (picture next to the post title)
  a post divider (picture in between each post)

You can add/change:
  •   the Blog title and description shown on the header
  •   the font colors
  •   the font  Click here to learn how.  (This template allows you to alter the date, post title and sidebar titles with a different font for each one.)
   Don't forget to add my button to your sidebar. Here's the code:


<center><a href=http://www.blogdesignsbydani.com/><img src="http://bdbd.blogdesignsbydani.com/Dani Button.png"/></a></center>


Images copyright Katie Castillo

From her kit Peppermint Patty

November 17, 2011

Christmas Treats Template

By using this template, you agree to the terms of use.
*This template may not show the header when you insert the HTML/CSS code. If it does not appear, do the following:

1. Go to the Design page and make sure you are on the Page Elements section.
2. Click on the Edit button on the Header box.
3. In the pop-up window, click "Behind Title and Description and then insert the following address in the box that says, "From the Web"

http://templates.blogdesignsbydani.com/christmastreats/header.png

4. Click Save and View Blog. Your header should appear!


 This template includes:
  a wide 2-column layout
  a background
  a matching header
  a post icon (picture next to the post title)
  a post divider (picture in between each post)

You can add/change:
  •    the Blog title and description shown on the header
  •    the font colors 
  •     the font  Click here to learn how.  (This template allows you to alter the date, post title and sidebar titles with a different font for each one.)
   Don't forget to add my button to your sidebar. Here's the code:


<center><a href=http://www.blogdesignsbydani.com/><img src="http://bdbd.blogdesignsbydani.com/Dani Button.png"/></a></center>


Images copyright Katie Castillo

From her kit Gingerrific

August 29, 2011

Chalkboard Fun Template

By using this template, you agree to the terms of use.

 This template includes:
  a wide 2-column layout
  a background
  a matching header
  a post icon (picture next to the post title)
  a post divider (picture in between each post)

You can add/change:
  •     the Blog title and description shown on the header
  •    the font colors 
  •     the font  Click here to learn how.  (This template allows you to alter the date, post title and sidebar titles with a different font for each one.)
   Don't forget to add my button to your sidebar. Here's the code:


<center><a href=http://www.blogdesignsbydani.com/><img src="http://bdbd.blogdesignsbydani.com/Dani Button.png"/></a></center>


Design Elements by Crazy-4-Monograms
From her kit Class Act

July 18, 2011

Yellow Daisies Template

By using this template, you agree to the terms of use.

 This template includes:
  a wide 2-column layout
  a background
  a matching header


You can add/change:
  the font  (Click here to learn how.)
  the font colors
  the Blog title and description shown on the header

NEW: The fonts for the Post Title, Sidebar Titles and Date Header can all be changed individually. Change them the same way you change all the other fonts.

Don't forget to add my button to your sidebar. Here's the code:


<center><a href=http://www.blogdesignsbydani.com/><img src="http://bdbd.blogdesignsbydani.com/Dani Button.png"/></a></center>


Design Elements by Just So Scrappy
From her kit Denim and Daisies

June 29, 2011

Puzzle Pieces Template

By using this template, you agree to the terms of use.

 This template includes:
  a wide 2-column layout
  a background
  a matching header
  a post icon (picture next to the post title)
  a post divider (picture in between each post)

You can add/change:
  the font  (Click here to learn how.)
  the font colors
  the Blog title and description shown on the header

Don't forget to add my button to your sidebar. Here's the code:


<center><a href=http://www.blogdesignsbydani.com/><img src="http://bdbd.blogdesignsbydani.com/Dani Button.png"/></a></center>


Design Elements by Just So Scrappy
From her kit Hope for Brady

May 10, 2011

Wide 2-Column Template Fix

The problem described below is likely to have just been a problem with Blogger, not my template. Shortly after this problem arose Blogger shut down for a day, not allowing anyone to make any new posts. They made some corrections and when Blogger came back up the problem described below was gone. If you still think you have a problem, email me and I would love to help you!

I recently received a comment that the Wide 2-Column Template that I posted would not allow users to add new labels to their blog posts. Because I made the template by making just a few minor changes to the Blogger Minima template, none of the changes related to the labels, I was very surprised that there would be problems. But sure enough, she was right. I really am not an expert with this stuff, I don't claim to be, and sometimes HTML and CSS coding just does weird things. In other words, there seems to be nothing wrong with the code, but I found a solution online that solved the problem for me. Please let me know whether or not it works for you. I apologize for this inconvenience.

Solution: On this blog, The Real Blogger Status, the author explains that sometimes the post template can become corrupted. Read his instructions for the full explanation and then read what I did:

I went to Design and then "Edit HTML" and scrolled down (or Ctrl-F to find this part) until I saw:

<div id='main-wrapper'>
<b:section class='main' id='main' showaddelement='no'>
<b:widget id='Blog1' locked='true' title='Blog Posts' type='Blog'/>
</b:section>
</div>

Their instructions say to Remove the part in red, Save your template (confirming that you are deleting a widget) and then Replace that line and Save it again. (Your blog posts won't be deleted.)

When I did this, I removed the part in red and saved my template, but Blogger did not actually delete it. So I simply clicked View Blog and the labels came back!

Hopefully this does not happen for everyone. Please let me know if you are having trouble. Also, please let me know if there is the same problem for my other templates. I checked them and they worked fine for me but you never know!

~Dani

April 25, 2011

Yellow Roses Template

By using this template, you agree to the terms of use.

 This template includes:
  a wide 2-column layout
  a background
  a matching header
  a post icon (picture next to the post title)
  a post divider (picture in between each post)

You can add/change:
  the font  (Click here to learn how.)
  the font colors
  the Blog title and description shown on the header

Don't forget to add my button to your sidebar. Here's the code:


<center><a href=http://www.blogdesignsbydani.com/><img src="http://bdbd.blogdesignsbydani.com/Dani Button.png"/></a></center>


Design Elements by Crazy-4-Monograms
From her kit No Place Like Grandma's

April 9, 2011

Simple Swirls Template

By using this template, you agree to the terms of use.
 
 This template includes:
  a wide 2-column layout
  a background
  a matching header
  a post icon (picture next to the post title)
  a post divider (picture in between each post)

You can add/change:
  the font  (Click here to learn how.)
  the font colors
  the Blog title and description shown on the header

Don't forget to add my button to your sidebar. Here's the code:


<center><a href=http://www.blogdesignsbydani.com/><img src="http://bdbd.blogdesignsbydani.com/Dani Button.png"/></a></center>


Design Elements by Summertime Designs
From her kit Dryer Lint at Tiffany's 

March 29, 2011

Sew Cute Template

By using this template, you agree to the terms of use.
 
Click Here for the HTML Code
 This template includes:
  a wide 2-column layout (950px)
  a background
  a matching header
  a post icon (picture next to the post title)
  a post divider (picture in between each post)

You can add/change:
  the font  (Click here to learn how.)
  the Blog title and description shown on the header

Don't forget to add my button to your sidebar. Here's the code:


<center><a href=http://www.blogdesignsbydani.com/><img src="http://bdbd.blogdesignsbydani.com/Dani Button.png"/></a></center>


Design Elements by Crazy-4-Monograms
From her kit Sew Pretty 

March 15, 2011

Happy Flowers Template

 By using this template, you agree to the terms of use.
 
Click here for the link to html code
 This template includes:
  a wide 2-column layout (950px)
  a background
  a matching header
  a post icon (picture next to the post title)
  a post divider (picture in between each post)

You can add/change:
  the font  (Click here to learn how.)
  the Blog title and description shown on the header

Don't forget to add my button to your sidebar. Here's the code:


<center><a href=http://www.blogdesignsbydani.com/><img src="http://bdbd.blogdesignsbydani.com/Dani Button.png"/></a></center>


Design Elements by Just So Scrappy
From her kit Happy Day 

March 7, 2011

Wide 2-Column Template

Below is a link to a Wide 2-Column Template. There is no background or header included with this template. I've left it blank so that you can customize it however you like. You can add any of my free backgrounds and headers the way you did before.

This template has a width of 900px, so use the 3-Column code for any of my backgrounds that you choose to use. This template is wider to allow for more room for your blog posts and a slightly wider sidebar.

The border around the header has also been removed.

Also, this template lets you change the font of your Post Titles.

Here is the basic Minima Template: (click to enlarge)

Here is my Wide 2-Column Template: (click to enlarge)


Click here for the html code

Remember to backup your template and widgets first!

If you have any problems with your labels after using this template, follow the instructions here

July 27, 2009

How to Add a Template


By adding my designs to your blog, you agree to my terms of use.

UPDATE: Blogger has updated their interface and I have updated this tutorial to correspond to the new look. If you still have the old look, just look at the instructions that are in green. (I recently tried to add one of my templates and I was given an error message that I don't understand. I will update this more once I figure out the problem.)

What's the difference between a template and a background?
-A background is just the picture that shows up like wallpaper on the back of your blog.
-A template is a set of instructions that tells your blog what the layout should look like, i.e. how many columns, what font, etc.

Before you add a template:
1. Remove any free background you already have by clicking Layout from the drop down menu.
Then find the HTML/JavaScript gadget with your background in it and click Remove.

(Old interface instructions: Remove any free background you already have by clicking Design, then find the HTML/JavaScript gadget with your background in it and click Remove. )

2. Next, back-up your sidebar gadgets. You can do this however you choose. You can make a list of all the gadgets that you currently have, copy the html on those that use html, copy the info on any other gadgets and make sure that you can upload any sidebar pictures again. You shouldn't lose your gadgets by following my instructions, but you never know what might go wrong. It's best to be safe.

(Old interface instructions: same as above)


3. If you are changing from a 3-Column template to a 2-Column template, move all of your gadgets to your right sidebar. Do this by clicking Layout from the drop down menu or left sidebar (depending on what screen you are on) and then clicking and dragging each gadget into the sidebar on the right.

(Old interface instructions: You will click on Design instead of Layout.)

4. Now, backup your template by going to your Template page and clicking Backup/Restore on the right side of the screen. Click Download Full Template and Save. Find a folder on your computer to save it to.

After you have downloaded your template, click Edit HTML. It will give you a disclaimer about editing your HTML, warning you that only advanced users should edit the HTML and that you may not be able to use the Template Designer for all of its features if you do so. If you are ok with this, click "Proceed".

(Old interface instructions: Backup your template by going to your Layout page and clicking Edit HTML. At the top where it says "Backup/Restore Template", click Download Full Template and click Save. Find a folder on your computer to save it to.)


Now you are ready to add a Template.


To add a Template:
1. Click on the link given in the post of the template you like.
2. Select all of the text in the white section (Hold down "Ctrl" and then "A" or go to "Edit" and then "Select All")
Copy everything on the page. (To copy, make sure all of the text is selected and then hold down the "Ctrl" button and the "C" button or go to "Edit" at the top of your browser window and click "Copy".)

Here is what you should see. The code I selected is in blue. (Click to enlarge.):


3.  Go back to your Template page and click Edit HTML.

(Old interface instructions: Go back to your Design page and click Edit HTML.)

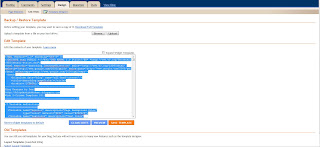
4. Erase everything in the box in the middle of the page as shown below, highlighted in blue.


(Old interface instructions: Erase everything in the box in the middle of the page as shown below, highlighted in blue.)
(Old Interface)

5. Paste the HTML that you copied into this box by holding down "Ctrl" and "V" or going to "Edit" at the top of the browser and clicking "Paste".
6. Click Save Template.
7. This last part is important!  Your blog may say, "Warning: Your new template does not include the following widgets:" and then it will list the extra widgets that you already have on your blog. It then asks if you want to keep them.  YES you do!  Click Keep Widgets.
8. Now, click View Blog.

You're done!!

If you have any problems, you can always go back to your old template by going back to the Template page ("Edit HTML" page on the old interface) and clicking "Backup/Restore" ("Upload" on the old interface). Find the copy of your original template that you saved to upload back onto your blog. Or simply choose any of Blogger's template from the Template Designer.

Or, if you have the old Blogger interface, you can go back to a "Minima" Template (the basic blogger template) by going to Design and clicking on Edit HTML and then clicking Select Layout Template (at the bottom) and then choosing "Minima". Click "Save Template". You will back to normal again.

Don't forget to add one my buttons when you are done!!