A month or two ago I said I needed to delete the backgrounds that no one was using so that I could free up more space for my images. I have gone through and made a list of the backgrounds that no one has left any comments on, indicating to me that they were using them or were interested in them. I am only considering the old ones from 2009. If you have one of my old backgrounds, please look through this list and leave a comment on this post if you would like one of these to be kept. Click on the title to go to the post with that background.
Fun with Circles
Bubble Madness
Green Foliage
Rows of Flowers
Pink Grungy Swirls
Black n White Design
Green Embellished Swirls
Red n Orange Squares
4th of July: USA Flag
Stripes n Bubbles
Blue n Brown Diagonal Stripes
Blue n Green Diagonal Stripes
Trees
Red, Blue n Green Circles
Purple Plaid n Flowers
Blue Plaid n Flowers
Lime Green n Flowers
Lime Green Flowers n Stripes
Yellow, Red and Green Plaid and Stars
Wide Woven Blue
Pink n Orange Button
Falling Flowers - Pink
Falling Flowers - Blue
Falling Flowers - Purple
Blue Beveled
Multi-Colored Diamonds and Stripes
Sepia Striped Grain
Pink Flowers
Blue Flowers
Blue Torn
Brown n White n Orange
Brown n White n Pink
Green Circles
Green Waves
Green Swirls
Purple Stripes
Stars n Squiggles
Orange Squiggles
Wide Woven Pink 2
Wide Woven
Woven Black n White
Tulips, Tulips
Tulips
July 29, 2011
July 27, 2011
How to Make Your Own Blog Button
One of the best ways to get your blog noticed is to make a blog button. A blog button is a small image that fits in your sidebar that gives the title of your blog and when clicked, links directly to your blog. It really isn't very helpful to put your button on your own blog since anyone that sees it is already at your blog. However, if you put the right HTML code below your button, your readers can copy the code, paste it onto the sidebar of their blog and have your button show up on their blog. It's basically free advertising. Here's an example of mine:

Want to learn how to make one yourself?
<center><a href=http://www.blogdesignsbydani.com/><img src="http://bdbd.blogdesignsbydani.com/Dani%20Button.png"/></a></center>
Want to learn how to make one yourself?
July 25, 2011
Chalkboard Fun

<script>document.write(unescape("%3Cstyle%20type%3D%22text/css%22%3Ebody%7Bbackground-image%3Aurl%28%22http%3A//backgrounds.blogdesignsbydani.com/Crazy4Monograms/Chalkboard%20Fun.jpg%20%22%29%3Bbackground-position%3Acenter%3B%20background-repeat%3A%20no-repeat%3B%20background-attachment%3A%20fixed%3B%7D%3C/style%3E%20%3Cdiv%20id%3D%22tag%22%20style%3D%22position%3Aabsolute%3B%20left%3A0px%3Btop%3A30px%3B%20width%3A150px%3B%20height%3A50px%3B%22%3E%3Ca%20target%3D%22_blank%22%20href%3D%22http%3A//www.blogdesignsbydani.com%22%20title%3D%22http%3A//www.blogdesignsbydani.com%22%3E%3Cimg%20border%3D%220%22%20src%3D%22http%3A//backgrounds.blogdesignsbydani.com/tags/DaniBlacknWhite.png%22/%3E%20%3C/a%3E%3C/div%3E"))</script>
<script>document.write(unescape("%3Cstyle%20type%3D%22text/css%22%3Ebody%7Bbackground-image%3Aurl%28%22http%3A//backgrounds.blogdesignsbydani.com/Crazy4Monograms/Chalkboard%20Fun_3Column.jpg%20%22%29%3Bbackground-position%3Acenter%3B%20background-repeat%3A%20no-repeat%3B%20background-attachment%3A%20fixed%3B%7D%3C/style%3E%20%3Cdiv%20id%3D%22tag%22%20style%3D%22position%3Aabsolute%3B%20left%3A0px%3Btop%3A30px%3B%20width%3A150px%3B%20height%3A50px%3B%22%3E%3Ca%20target%3D%22_blank%22%20href%3D%22http%3A//www.blogdesignsbydani.com%22%20title%3D%22http%3A//www.blogdesignsbydani.com%22%3E%3Cimg%20border%3D%220%22%20src%3D%22http%3A//backgrounds.blogdesignsbydani/tags/DaniBlacknWhite.png%22/%3E%20%3C/a%3E%3C/div%3E"))</script>
July 20, 2011
Dotted Flowers Header
Use with the background: Dotted Flowers

http://headers.blogdesignsbydani.com/JustSoScrappy/Dotted Flowers Header.jpg
Design Elements by Just So Scrappy
(from her kit called Tweet Tweet)
July 18, 2011
Yellow Daisies Template
By using this template, you agree to the terms of use.

This template includes:
a wide 2-column layout
a background
a matching header
You can add/change:
the font (Click here to learn how.)
the font colors
the Blog title and description shown on the header
NEW: The fonts for the Post Title, Sidebar Titles and Date Header can all be changed individually. Change them the same way you change all the other fonts.
Don't forget to add my button to your sidebar. Here's the code:
<center><a href=http://www.blogdesignsbydani.com/><img src="http://bdbd.blogdesignsbydani.com/Dani Button.png"/></a></center>
July 12, 2011
Bold Stars

<script>document.write(unescape("%3Cstyle%20type%3D%22text/css%22%3Ebody%7Bbackground-image%3Aurl%28%22http%3A//backgrounds.blogdesignsbydani.com/JustSoScrappy/Bold Stars.jpg%20%22%29%3Bbackground-position%3Acenter%3B%20background-repeat%3A%20no-repeat%3B%20background-attachment%3A%20fixed%3B%7D%3C/style%3E%20%3Cdiv%20id%3D%22tag%22%20style%3D%22position%3Aabsolute%3B%20left%3A0px%3Btop%3A30px%3B%20width%3A150px%3B%20height%3A50px%3B%22%3E%3Ca%20target%3D%22_blank%22%20href%3D%22http%3A//www.blogdesignsbydani.blogspot.com%22%20title%3D%22http%3A//www.blogdesignsbydani.com%22%3E%3Cimg%20border%3D%220%22%20src%3D%22http%3A//backgrounds.blogdesignsbydani.com/tags/DaniBlacknWhite.png%22/%3E%20%3C/a%3E%3C/div%3E"))</script>
<script>document.write(unescape("%3Cstyle%20type%3D%22text/css%22%3Ebody%7Bbackground-image%3Aurl%28%22http%3A//backgrounds.blogdesignsbydani.com/JustSoScrappy/Bold Stars_3Column.jpg%20%22%29%3Bbackground-position%3Acenter%3B%20background-repeat%3A%20no-repeat%3B%20background-attachment%3A%20fixed%3B%7D%3C/style%3E%20%3Cdiv%20id%3D%22tag%22%20style%3D%22position%3Aabsolute%3B%20left%3A0px%3Btop%3A30px%3B%20width%3A150px%3B%20height%3A50px%3B%22%3E%3Ca%20target%3D%22_blank%22%20href%3D%22http%3A//www.blogdesignsbydani.com%22%20title%3D%22http%3A//www.blogdesignsbydani.com%22%3E%3Cimg%20border%3D%220%22%20src%3D%22http%3A//backgrounds.blogdesignsbydani.com/tags/DaniBlacknWhite.png%22/%3E%20%3C/a%3E%3C/div%3E"))</script>
July 8, 2011
How to Change the Size and Font of Your Post Titles
Many of you may have noticed that when you go into the Template Designer in Blogger (if you have the Minima Template) and try to change the size and font of your Post Title there isn't an option to do so. (Remember my Post on Cute Blogger Fonts?) You can change the color, but not the size and font. Every other type of heading has that option, but not the Post Title. I don't know why this is, but there are a few ways to get around it.
The First option is to follow these instructions: Cute Font Post Titles and Sidebar Titles . This tutorial looks great on your blog, but is fairly complicated. It does allow you to use any true-type font you want and lets you adjust the size of these titles yourself. But it requires you to download several files and open a webs.com account.
The Second option I came up with myself. (You will have to edit your HTML, so make sure you back-up your template!) One more thing...this tutorial is just for the Blogger Minima Template. (Here's how to get this template: Follow Steps 4-7 HERE.)
(Click on images to enlarge them.)
From the Design tab, click "Edit HTML".
Scroll down until you see "Variable Definitions". Now, let's take a minute to understand what you see here: (Don't change anything yet! Just look!)
 Every portion of text in your blog is given a color and a font (except the Post Title font). In order for your blog to know which ones to use, each type of text is given a "variable name". The first line says the Page Background Color has a variable name of "bgcolor". So when your HTML/CSS says "bgcolor" it will change the Page Background Color. If you look through this all, you will notice that there is a variable name for "Post Title Color" (it is "titlecolor") but there is not a variable name for "Post Title Font".
I will show you how to create a variable name for the "Post Title Font". Scroll down to see the variable names for the fonts: (Remember, don't change anything yet. Just look!)
 We are going to copy the variable information for the Blog Title and make a few changes so that it will work for the Post Titles.
Here's how to do it:
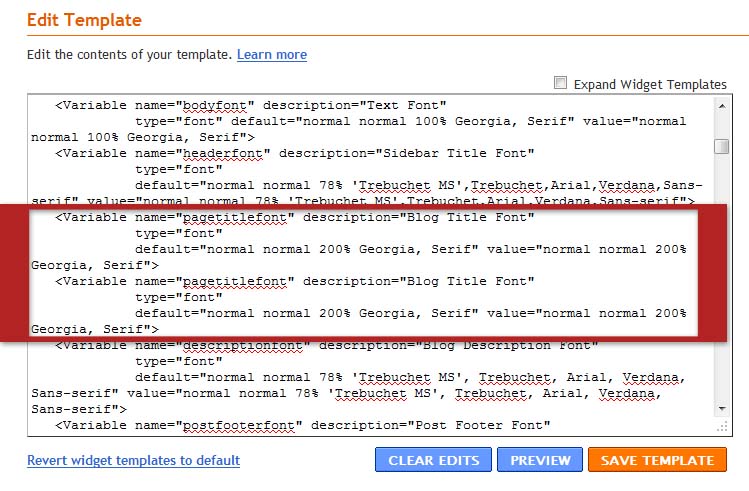
1. In the Variable Definitions, copy the Variable definition for the Blog Title Font. Make sure to get the entire thing. Here it is just in case:
2. Now paste it right below the original so that you see the same thing twice. Your variable definitions should look like this:

3. In the Variable that you copied, you need to make the following changes:
Change "pagetitlefont" to "titlefont" and Change "Blog Title Font" to "Post Title Font"
Your new Variable should look like this: (I highlighted the changes for you in red.)
<Variable name="titlefont" description="Post Title Font"
type="font"
default="normal normal 200% Georgia, Serif" value="normal normal 200% Georgia, Serif">

4. Now scroll down until you see this:
Scroll a little farther until you see:

Add the following line:
font:$titlefont;
So that it reads:

(Make sure to copy it exactly. You must have the dollar sign and the semicolon or it won't work. Also, the bracket } must be where you see it above.)
3. Preview your changes and click "Save Template" if everything still looks ok. Your Post Title may not look much different, but as long as nothing drastically changed, you are fine.
4. Now time to change the font and size of your Post Title. From the Design tab, click "Template Designer". Then click "Advanced".
Scroll down until you see "Post Title Font"
Once the "Post Title Font" is highlighted, click the font you like best. (You can Preview it immediately when you click on each font.)

To make the Post Title bigger, change the percentage you see in the box to a bigger number. To make it smaller, change it to a smaller number. Just make sure you leave the % sign. To see the changes, just click in the blank gray area and the changes will be applied in the Preview box.
Once you are done, click "Apply to Blog" and then "View Blog"
There you go! Customized Post Title Font!
The First option is to follow these instructions: Cute Font Post Titles and Sidebar Titles . This tutorial looks great on your blog, but is fairly complicated. It does allow you to use any true-type font you want and lets you adjust the size of these titles yourself. But it requires you to download several files and open a webs.com account.
The Second option I came up with myself. (You will have to edit your HTML, so make sure you back-up your template!) One more thing...this tutorial is just for the Blogger Minima Template. (Here's how to get this template: Follow Steps 4-7 HERE.)
(Click on images to enlarge them.)
From the Design tab, click "Edit HTML".
Scroll down until you see "Variable Definitions". Now, let's take a minute to understand what you see here: (Don't change anything yet! Just look!)

I will show you how to create a variable name for the "Post Title Font". Scroll down to see the variable names for the fonts: (Remember, don't change anything yet. Just look!)

Here's how to do it:
1. In the Variable Definitions, copy the Variable definition for the Blog Title Font. Make sure to get the entire thing. Here it is just in case:
<Variable name="pagetitlefont" description="Blog Title Font"
type="font"
default="normal normal 200% Georgia, Serif" value="normal normal 200% Georgia, Serif">
type="font"
default="normal normal 200% Georgia, Serif" value="normal normal 200% Georgia, Serif">
2. Now paste it right below the original so that you see the same thing twice. Your variable definitions should look like this:
3. In the Variable that you copied, you need to make the following changes:
Change "pagetitlefont" to "titlefont" and Change "Blog Title Font" to "Post Title Font"
Your new Variable should look like this: (I highlighted the changes for you in red.)
type="font"
default="normal normal 200% Georgia, Serif" value="normal normal 200% Georgia, Serif">

4. Now scroll down until you see this:
/* Posts
-----------------------------------------------
*/
-----------------------------------------------
*/
Scroll a little farther until you see:

Add the following line:
font:$titlefont;
So that it reads:

(Make sure to copy it exactly. You must have the dollar sign and the semicolon or it won't work. Also, the bracket } must be where you see it above.)
3. Preview your changes and click "Save Template" if everything still looks ok. Your Post Title may not look much different, but as long as nothing drastically changed, you are fine.
4. Now time to change the font and size of your Post Title. From the Design tab, click "Template Designer". Then click "Advanced".
Scroll down until you see "Post Title Font"
Once the "Post Title Font" is highlighted, click the font you like best. (You can Preview it immediately when you click on each font.)

To make the Post Title bigger, change the percentage you see in the box to a bigger number. To make it smaller, change it to a smaller number. Just make sure you leave the % sign. To see the changes, just click in the blank gray area and the changes will be applied in the Preview box.
Once you are done, click "Apply to Blog" and then "View Blog"
There you go! Customized Post Title Font!
July 5, 2011
Crinkled Flowers Header 2
Use with the background: Crinkled Flowers

http://headers.blogdesignsbydani.com/JustSoScrappy/Crinkled Flowers Header2.jpg
Design Elements by Just So Scrappy
(from her kit called Memories)
July 1, 2011
Soft Dots and Plaid Header
Use with the background: Soft Dots and Plaid

Small
http://headers.blogdesignsbydani.com/JustSoScrappy/Soft Dots and Plaid Header_small.jpg
Large
http://headers.blogdesignsbydani.com/JustSoScrappy/Soft Dots and Plaid Header.jpg
Design Elements by Just So Scrappy
(from her kit called Baby Mine Boy)
Subscribe to:
Posts (Atom)


