To start, Go To http://picasa.google.com/ and click Download Picasa 3. Follow the instructions given to download it onto your computer. I will now explain how to Add Text and Pictures to your header.
(You should already have chosen a header and saved it to your computer by Right-Clicking on the image and choosing Save As.)
Adding Text to your header:
1. Open Picasa and Double-Click on your header. This will bring you to the editor.
2. Click Text from the icons on the left.
 3. Click and Drag on your header to create a text box.
4. Type your text and Edit it as you choose using the buttons on the left. (After you type, you may have to highlight the text before pushing the buttons that change the size, color, etc.)
5. Click Apply and Back to Library when you are done.
6. If you do not have any pictures to add Skip to Step 19 to add the header to your blog.
Adding Pictures to your header:
7. Choose the picture(s) that you would like to add to your header. Move the header so that it is in the same folder as the picture(s) you will be using.
8. In Picasa, Select the header and the pictures by holding down “Ctrl” while clicking on each picture. Then click Collage.
 Or
Or 9. Choose the Settings as shown. (Picture Pile, Solid Color, Choose Any Size)
 10. Click on the picture of the Header. Move your mouse over the picture until you see the glove. Then, Click the white dot and Drag out until the header mostly fills the page. (Keep the angle at 0.) You may need to let go and slide the picture over.
 11. Now Adjust the size of your photo the same way, except rotate it at any angle you choose.
12. Click Create Collage when you are done.
13. Once the collage is done, you will see a box in the top left for further editing. Click Crop. (We will remove the extra black in the background.)
14. Choose Manual from the drop down menu.
15. Click and Drag your mouse so that a box appears. Adjust as necessary so that the box makes a border around your header.
16. Click Apply.
17. Find and click the Export button on the bottom of the screen.
 18. Choose any folder to save it to, but click Use Original Size. (Make a note of the location that you saved it to so that you can find it later.) Click OK.
 Putting the header on your blog:
19. Login to your blog and click Layout.
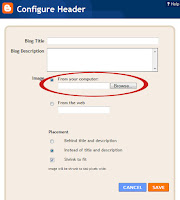
20. On the “Add and Arrange Page Elements” page click Edit from the rectangle labeled “Header”.
21. A window will pop-up. Select From Your Computer, Instead of Title and Description, and Shrink to Fit.
 22. Click Browse and find the file where your header was saved.
23. Click Save and View Blog. Your done!!


Thank you so much for your wonderful backgrounds and tutorials for editing a header in Picasa!
ReplyDeleteThank you so much for all your help with the tutorials, but I have a question on how to make my header the correct size. Do I just need to change the layout to be smaller?
ReplyDeletePoulos Family,
ReplyDeleteYes, your header is so small because your layout is narrow. Since you are using the Blogger Picture Window template you can go to the Design tab and then click Template Designer to change the width of your blog. Once you change it, your header will still be small. You will need to remove it and then add it again so that the size coordinates with your new wider layout.
Thank you so much! I was able to change it using the adobe photoshop elements that I have at work. I was supposed to have it put on my laptop, but it had to be re-imaged and hasn't been put back yet. Thanks again for all your help!
ReplyDeletehow do you get rid of the checkboard that is behind some headers. I know that is to symbolize transparent, but when I upload it to my blog, it is still there. How do you edit that out.
ReplyDeleteCan you show me an example? I'm not sure what you mean.
DeleteHello Dani :)
ReplyDeleteI came across your blog and it was very helpful. I was able to use picasa and make a collage picture of my baby Neo and posted it in my blog (babyneosmama.blogspot.com).
thanks much :)